by Jack Lyon
I recently had the pleasure of doing an interview for the Chicago Manual of Style “Shop Talk” column. In the interview, I explained how to record a simple macro for transposing characters while editing.
After reading the interview, editor Kristi Hein commented:
Terrific. Next, please discuss the process of choosing a keystroke combination for your macro: not using one of the many you’ve already assigned, making it a combo that’s not too convoluted for the hands (defeating the purpose somewhat), and that you will remember among all the other keystroke combinations you’ve assigned. Therein lies the true art of automating Word effectively and efficiently.
Kristi is right, but wow, that’s a tall order. Let’s look at each requirement separately.
Not using one of the many we’ve already assigned
To not use one of the many keyboard combinations already assigned, we need to know the keystroke combinations we’ve already assigned. Here’s how to do that:
- Click CTRL + P to open Word’s “Print” dialog.
- Under “Settings,” click the dropdown list that begins with “Print All Pages.”
- Under “Document Properties,” click “Key Assignments.” (Also, notice the other things you might want to print, such as styles and AutoText entries.)
- Click the “Print” button.
You’ll get a nicely formatted document that shows all of your existing key combinations. The entries will look something like this, with the key combinations on the left and the macro names on the right:
Alt+Ctrl+Shift+S — Normal.NewMacros.ChangeStyleBasedOn
Alt+Ctrl+Shift+I — Normal.NewMacros.CheckIndexCodes
Alt+Ctrl+Shift+C — Normal.NewMacros.FixCodes
Alt+Ctrl+Shift+M — Normal.NewMacros.ParseMetadata
“And how do I assign key combinations to begin with?” you’re wondering. There are (at least) a couple of ways:
When you go to record a new macro (under View > Macro), one of your options is to assign a key combination by pressing the “Keyboard” button:
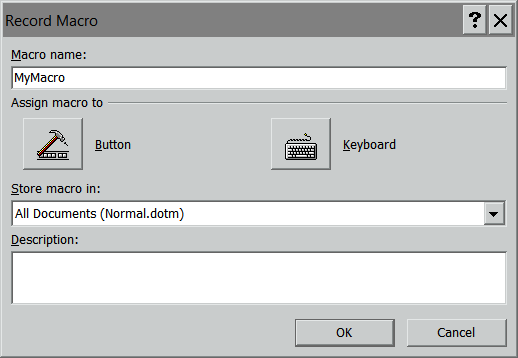
Using the keyboard option
When you do that, you’ll see the following dialog:

The dialog for entering the key combination
If you were working with an existing macro (editing rather than recording), you’d see any existing key combinations under “Current keys.” To assign a new combination, put your cursor in the box labeled “Press new shortcut key” and, well, press a new shortcut key.
If the new key is already assigned to a macro, you’ll get a “Currently assigned to” message like this:

Currently assigned message
That’s handy because it helps you avoid accidentally overwriting a combination that you’ve already assigned (although you can overwrite one on purpose). If you don’t get that message, you’re good to go, and you can click the “Assign” button (on the lower left) and then the “Close” button (on the lower right) and then record the keystrokes that will make up your macro. (When you’re finished recording, click View > Macro > Stop Recording.)
If you want to assign a key combination to an existing macro, things get a little more complicated:
- Click “File > Options.”
- Click the “Customize Ribbon” button (on the left).
- Under “Choose commands from,” select “Macros” (unless you want to use one of Word’s built-in commands, which you can also do).
- At the bottom of the dialog, you’ll see “Keyboard shortcuts: Customize.” Click the “Customize” button and proceed as explained above.
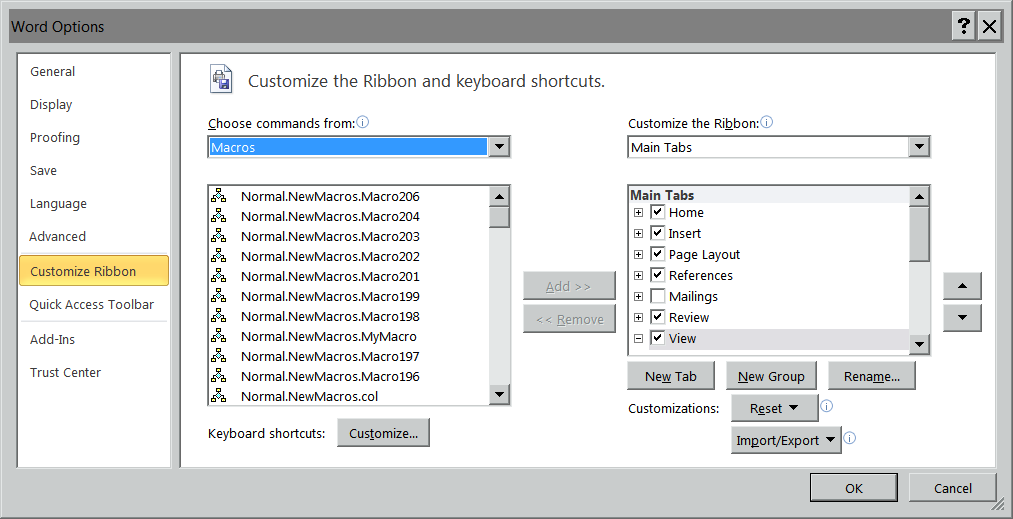
Customizing
But to continue…
Making it a combo that’s not too convoluted for the hands
This, of course, depends on how many fingers you have (I have ten so far) and how large or small they are, along with your native dexterity. As you can see in the picture above, I’m partial to ALT + CTRL + SHIFT, which I actually find easy to press with my left hand while pressing a letter key with my right. If that’s too convoluted for you, you might try CTRL + SHIFT or CTRL + ALT, both of which are easy to do. ALT + SHIFT is a little more difficult. You can even use plain old CTRL or ALT with another character, but that starts to encroach on Word’s built-in key combinations (like CTRL + S to save a document).
There’s another system, however, that you may not know about:
- Press your desired key combination.
- Press another key.
The result will be something like this:

Two-step key
See that ,”1” after the “Alt+Ctrl+Shift+M”? That means I’ve just created a two-step key combination. To run the macro, I press ALT+CTRL+SHIFT+M. Then I press 1 (the one key, all by itself). At that point (and not before), the macro will run. Pretty slick!
What that means is that you can assign all kinds of two-step combinations (letters will work as well as numbers), which gives you two characters for the mnemonic you use to remember what a combination does. That’s twice as good as one! (Unfortunately, Word won’t let you use more than two.) It also means you can create shortcuts like these:
ALT+CTRL+SHIFT+H,1 (to apply the Heading 1 style)ALT+CTRL+SHIFT+H,2 (to apply the Heading 2 style)
Or these:
CTRL + SHIFT + T,C (to transpose characters)
CTRL + SHIFT + T,W (to transpose words)
CTRL + SHIFT + T,S (to transpose sentences)
CTRL + SHIFT + T,P (to transpose paragraphs)
And so on. The mind reels at the possibilities!
Making it a combo that you will remember among all the other keystroke combinations you’ve assigned
Using two-step combinations should help with that requirement as well, but for serious keyboard junkies there’s another solution — XKeys. The company manufactures various models, from 24 keys on up to 128 keys! You can assign the keys to your macros, label the keys, color code them, and so on. The 60-key model looks like this:
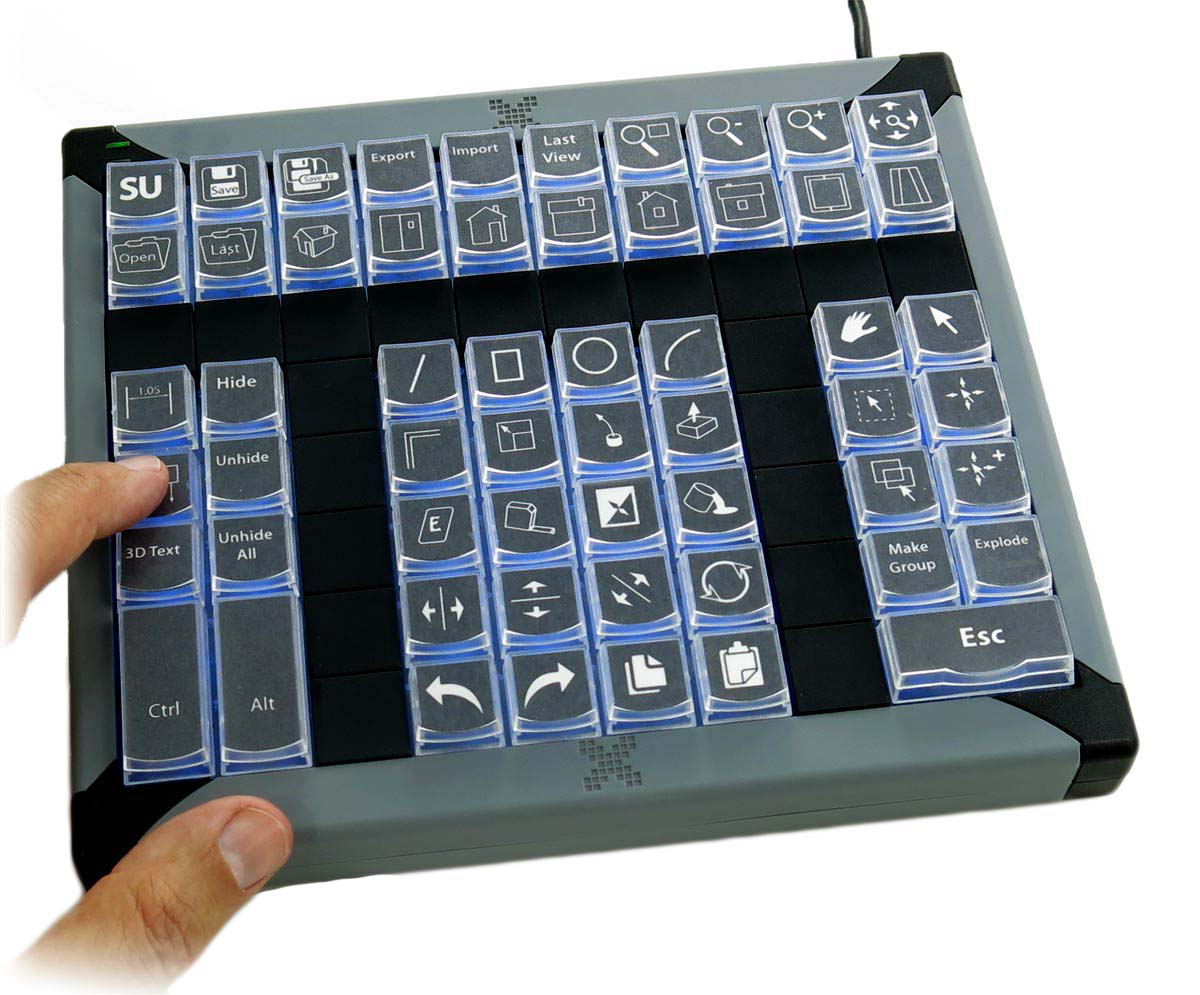
The 60-key XKeys
Rich Adin swears by this gadget, and he’s one of the most productive copyeditors I know. Maybe you’d find it useful too.
We’ve met the requirements
In summary, we’ve figured out some ways to meet all of Kristi Hein’s requirements for key combinations:
- Not using one of the many you’ve already assigned.
- Making it a combo that’s not too convoluted for the hands.
- Making it a combo that you will remember among all the other keystroke combinations you’ve assigned.
These may seem like small things, but small things add up to greater editing efficiency, and that means more money in your pocket and less time at work, both of which are big things. I hope this essay will help you achieve them.
Jack Lyon (editor@editorium.com) owns and operates the Editorium, which provides macros and information to help editors and publishers do mundane tasks quickly and efficiently. He is the author of Microsoft Word for Publishing Professionals and of Macro Cookbook for Microsoft Word. Both books will help you learn more about macros and how to use them.


Jack is correct, I do swear by my XKeys. I first started using the device close to 20 years ago and I continue to use it. I began using it when I branched out in my macro writing with a program called MacroExpress (which I still use today). As I wrote macros to speed projects along, I rapidly ran out of easy keyboard shortcuts, especially as every software program had some built-in (think how many Word comes with, for example). Pressing Ctrl+Alt+Shift+F8 required two hands and a glance at the keyboard. XKeys let me assign that keyboard combination to a single keypress. Over the years I have introduced editors to XKeys and those who make extensive use of macros see XKeys as I do — an indispensable tool for editing. I think the company offers a 30-day trial period (you have to check). If you are willing to part with the money if you like the product, it would be worth giving it a trial.
(Disclaimer: I have no interest of any kind, other than as a purchaser and user of XKeys, in XKeys.)
LikeLike
Comment by americaneditor — August 31, 2015 @ 4:17 am |
Jack,
Great article as always. I would love to see the code for your Normal.NewMacros.ChangeStyleBasedOn macro.
LikeLike
Comment by Wayne C. Paul — September 2, 2015 @ 3:35 pm |
Wow! I finally took the link from email to read this. I’m honored to have my request met in such detail! I’m hesitant to pile on with this, but when I print out my Key Assignments, only the key combos and the macro recording date appear. The names I assigned to the macros do not appear! For example: Ctrl+F10, and on the next line, “Macro recorded 12/18/2006 by Kristi Hein.” (My system is Vista, Office 2007.) Years ago I created a Key Assignments printout following the same steps, and it DID have the macro names. I’m mystified, and of course frustrated that I can’t generate a fully populated, meaningful Key Assignments document. Interestingly, the new, no-macro-name list I generate today is simply a stripped-down duplicate of my old print; it includes none of the macros I’ve recorded since spring 2008 (I replaced my XP computer with my current Vista computer in fall 2008 — and had a struggle importing my macros, as I recall). So that’s a bummer (a Microsoft-related bummer, I hazard). But on the bright side, I do still have that old print — although I’ve recycled some of the key assignments since, so I’ve annotated it. Better still, Jack, your “Press another key” option is new to me, and wonderful to know about. I may look into the XKeys too. So thank you — and if you have any ideas about my missing macro names problem, I’d love to hear them.
LikeLike
Comment by Kristi Hein — September 5, 2015 @ 12:43 am |
I recently wrote a blog post for the Northwest Editors Guild on using a gaming mouse to provide additional buttons for triggering macros, and I recommend that anyone having problems with convoluted shortcut keys consider this as one alternative. The blog post can be found here: https://www.edsguild.org/blog/are-you-game-for-a-new-kind-of-mouse
LikeLike
Comment by Michael Schuler — May 27, 2021 @ 2:35 pm |