I rarely receive an entire manuscript in a single file. The manuscripts I work on are rarely single-author books; instead, each chapter is written by a different author or group of authors, and so the files are chapter oriented.
The Online Stylesheet
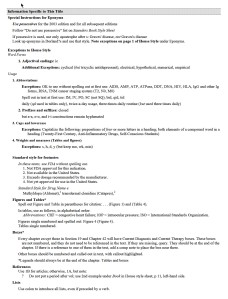
Even before I open the first chapter file, I begin preparing for the book. My first step is to create the online stylesheet (see Working Effectively Online V — Stylesheets [note: access to my online stylesheet is no longer available to the general reader]). I insert into the stylesheet any specific instructions for the project that I receive from the client. An example of specific instructions is shown here (you can make an image in this essay larger by clicking on the image):
I also add to the stylesheet any specific spellings or usages. For example, both “distention” and “distension” are acceptable spellings. If I know the client prefers one over the other, I add that spelling to the stylesheet. I also note the reference style to be used (usually with a quick note such as “references: follow AMA 10”). If there are variations, I will insert a note regarding the variations along with examples.
It is important to remember the purposes of the stylesheet. First, it is to help me be consistent throughout the project. It is not unusual to encounter a term or phrase in chapter 2 that I do not see again until chapter 10. Second, it is — at least in my business — a way for the client to observe my decision making. My stylesheets are available to my clients 24/7/365 and I encourage clients to review the stylesheets early and often. Most do not, but there have been occasions when a client has done so and has noted that they would prefer a different decision from the one I made. When the client takes the time to look at the stylesheet and advise me of a change they would like, it is easy to implement the change.
Third, the stylesheet is for the author. A well-done stylesheet can subliminally tell an author how good an editor I am. The author can see my diligence, and if the author has a preference (e.g., “distension” rather than “distention”), the author can communicate it and see that the change is made. Fourth, the stylesheet is for the proofreader. It tells the proofreader what decisions have been made and what are the correct spellings, and it gives myriad other information — depending on how detailed I make the stylesheet. It does neither the client nor the author nor me any good if the proofreader comes upon something the proofreader flags as an error because the proofreader doesn’t have a copy of my latest stylesheet in which the answer as to whether it is an error can be found (which is why my clients can both review the stylesheet online 24/7/365 and download the latest version — current to within 60 seconds of an entry having been made — 24/7/365).
Fifth, and finally, should I be asked to edit the next edition of the book, I can open the archived copy of the stylesheet and merge it into the stylesheet for the new edition. This enables consistency across editions, should that be something the client desires. And if the client’s schedule doesn’t accommodate mine, requiring the client to assign the new-edition project to another editor, either I or the client can access the archived stylesheet and provide a copy to the new editor. The importance here is twofold: first, it may give me a head start in the running to be the editor of the next edition; and second, it is good customer service and makes it easy for the client to think of me for other projects.
Once I have set up the stylesheet, it is time to tackle some of the other preediting tasks.
Cleaning Up the Manuscript
The first preediting tasks performed directly on the manuscript are aimed at cleaning up the manuscript. I do the cleanup before I do anything else on the manuscript. Cleanup means doing things like eliminating extra spacing and line breaks, and changing soft returns to hard returns or spaces. To clean up the manuscript, I use some of the macros found in The Editorium’s Editor’s Toolkit Plus 2014. For my methodology, I only use three of the Toolkit’s macros: FileCleaner, NoteStripper, and ListFixer. The only Toolkit Plus macro I use on every manuscript is ListFixer to convert Word’s autonumbered/lettered lists to fixed lists; the other two macros I use as needed.
EditTools has several macros that I use during the cleanup phase. The first macro I run is Delete Unused Styles. Unfortunately, Microsoft doesn’t permit some styles to be deleted, but this macro reduces style clutter. (Caution: If you are applying a template to the manuscript, do not run this macro after the template has been applied. Doing so may cause template styles to be removed.) I have found that running this macro first makes it easier to deal with the often myriad author-created styles, especially the ones that are attributes. A major shortcoming of Microsoft Word is that it encourages users to use styles but doesn’t make it easy for most users to understand how to use styles properly.
Another significant problem with Word styles occurs when a compositor has taken a typeset file and converted it to a Word document for editing. Every time the typesetter modified line or word spacing, for example, the modification shows as a new style. Similarly, when applying attributes like bold and italic to an already-styled word or phrase, Word creates a new style that is identical to the already-applied style except that it incorporates the attribute. Consequently, the manuscript has dozens of overriding styles that need to be removed. Although Delete Unused Styles won’t remove these types of styles (because they are being used in the document), by eliminating unused styles, I need to deal with fewer styles.
After Delete Unused Styles, I run EditTool’s Cleanup macro. The Cleanup macro lets me customize what I want done and also enables me to create a project- or client-specific cleanup dataset that complements the master Cleanup dataset.
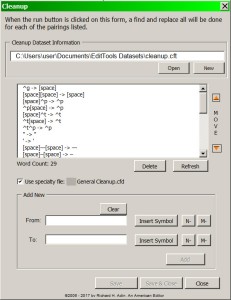
The Cleanup macro is intended for those things that I would cleanup in every manuscript. Look at the following image of the Cleanup Manager:
Fixes include changing two spaces to one space (in the image: [space][space]->[space]) and changing a tab followed by a paragraph marker to just the paragraph marker (in the image: ^t^p->^p). In other words, the routine cleanup. The macro also lets me link to a project-specific (“specialty”) cleanup dataset that contains less-generic items for fixing, such as replacing “ß” with “β”. (It is not necessary to have a project-specific cleanup dataset; anything that I would place in the specialty dataset I could put, instead, in the general cleanup dataset. I use the specialty datasets to avoid the problems that can occur if one client wants, for example, “ / ” [i.e., a space on each side of the slash] and another wants “/” without spacing.)
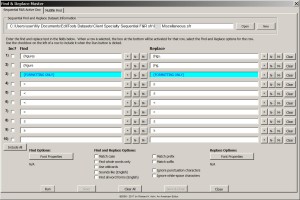
As we all know, different authors tend to have their own “peculiarities” when it comes to how something is styled. Those are the little things that one discovers either during a scan of a chapter or while editing. For example, in a chapter an author may style a measure inconsistently, first as “> 25” and then as “>25.” These are the types of things for which I previously used Word’s Find & Replace function. Because I scan the material before styling/typecoding, I often catch a number of these types of problems. To correct them, I use the Sequential F&R Active Doc tab of the Find & Replace Master macro, shown here:
This macro lets me do multiple find-and-replaces concurrently — I can select some or all of them. This macro lets me mix and match and I can save the find and replace items in a dataset for repeat use. The difference between the Sequential F&R Active Doc and the Cleanup macro is that the Cleanup macro is intended for things that are found in multiple manuscripts, whereas the Sequential F&R Active Doc is intended to replace Word’s Find & Replace.
After running Cleanup (and possibly Sequential F&R Active Doc), I may run Wildcard Find and Replace. It depends on what I noticed when I scanned the manuscript. I have created dozens of wildcard strings that I can run individually or as part of a script that I created. And if one of my already-created strings won’t work, I can create a new one. (Wildcard Find & Replace is discussed in this series in the future essay The Business of Editing: The AAE Copyediting Roadmap VI.)
After doing the cleanup routine, I then style/typecode (discussed in the next essay in this series, The Business of Editing: The AAE Copyediting Roadmap III) and insert preliminary bookmarks (see the future essay in this series The Business of Editing: The AAE Copyediting Roadmap IV). Then it is time to turn to Never Spell Word (which I’ll discuss in The Business of Editing: The AAE Copyediting Roadmap V).
Richard Adin, An American Editor


Hello Richard,
> The first macro I run is Delete Unused Styles.
If you use the Styles pane, you can call ActiveDocument.FormattingShowFilter = wdShowFilterStylesInUse instead.
LikeLike
Comment by andreismolin — March 28, 2017 @ 3:40 pm |
What you say is true but the problem is that it leaves the styles available. What I try to do, especially as most of my clients have templates they want used by the editors (but not by the authors), is remove as many of the styles as possible.
There is also another problem: Style Inserter. The Manager for Style Inserter will search the document for all available styles, not just those in use. Consequently, having the styles hidden doesn’t affect whether I need to scroll through them when creating the styles dataset.
Third, the way I work is this: First, I run delete unused styles. Second, I go through the styles in use and try to delete as many of them as I can. Much too often the difference between styles is something minor, such as a different font size. I try to remove as many as I can by consolidation. For my editing, I don’t need text that is 8 point, 9 point, 11.5 point, and 12 point. I need just 12 point.
Finally, if the client intends to import the edited file into a program like InDesign, which nearly all do, leaving an unused style as hidden will still result in the creation of a style in InDesign.
We all have our own ways of working and provide clients with our own sets of values. I prefer to give a client as clean a document as I can, which means removing styles, not hiding them.
LikeLike
Comment by americaneditor — March 29, 2017 @ 2:31 am |