Jack Lyon
In my previous post, Lyonizing Word: Workflow for Writing, I suggested some tools that would help authors write without the problems that are almost inevitable when working in Microsoft Word. These include inconsistent and meaningless formatting, document corruption, fouled-up footnotes, incorrect AutoCorrect “corrections,” and so on. Unfortunately, most authors already use Word and aren’t likely to change. How can we, as editors, help them create Word documents that are well-structured and clean, thus reducing our own workload?
Word itself includes a feature that helps make this possible, although I doubt that many editors or authors are even aware of it: Restrict Editing. You’ll find this feature on Word’s Ribbon interface under the Review tab. 
What does it do? It prevents authors from using arbitrary, meaningless formatting, applying various fonts in various sizes higgledy-piggledy all over the place as authors are wont to do. The only formatting they can do is with styles — and then only with the styles that you allow. You will like this. And your designer will like this. And your typesetter will like this.
At first, your authors will not like this. But once they understand how it works, they should find great relief in not having to design as well as write. All they have to do — all they can do — is apply a heading style to headings, a block quotation style to block quotations, and so on. They can get on with actually writing, rather than worrying about whether this heading should be bold and that one italic, whether poetry should use Garamond or Palatino. As technical writer Brendan Rowland notes in comment 153 on the blog Charlie’s Diary, “When you’ve worked with locked/protected docs in Word, you’ll never want to work any other way. Life becomes so much easier. No more user-created spaghetti formatting — this becomes a distant memory.”
Restricting Editing
Here’s how to set up a document that restricts editing in Microsoft Word:
- In Word, create a new document.
- Click the Review tab.
- Click the Restrict Editing icon (far right).
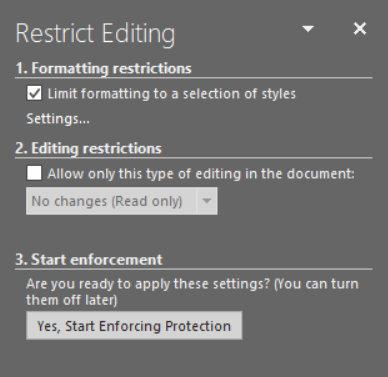
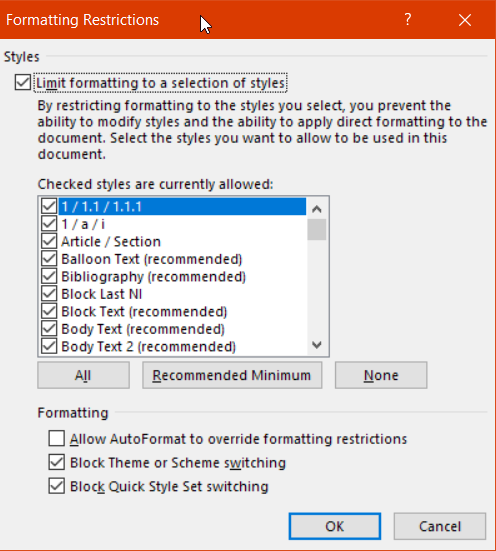
- Put a check in the box labeled “Limit formatting to a selection of styles.”

- Just below that, click Settings.
- Put a check in the new box labeled “Limit formatting to a selection of styles.”

- Put a check in the box next to each style that you want your authors to be able to use. For recommendations on what those styles might be, see my article “But What Styles?”
- Under the Formatting heading, make sure the first box is unchecked and the last two are.
- Click the OK button.
- Now, in the task pane on the right, click the button labeled “Yes, Start Enforcing Protection.”
- To enforce protection, enter a password, confirm it, and click OK. The password doesn’t need to be long and complex; it just needs to be something your authors won’t guess and that you will remember. In fact, something as simple as your initials will do. After you’ve entered a password, your authors can’t turn off protection, so it really is protection.

- Save the document.
- Give the document to your authors, instructing them to write their masterpieces in that document and no other.

Creating Character Styles
There is a problem with this system, however, and it’s a serious one. When you restrict formatting to a selection of styles, Word no longer allows you to use directly applied formatting like italic and bold — styles only, so no CTRL + I for you! The only way around this is to use character styles (not paragraph styles) that are set to use italic, bold, or whatever you need. And here, in my opinion, is what you need:
• Italic.
• Superscript.
• Subscript.
• Strikethrough.
What, no bold? Not unless you’re working with an author whose field requires bold — some branches of math or medicine, perhaps. But for most authors, access to bold means they’ll try to use it to format headings when they should be using a heading style, such as Heading 2 or Heading 3.
What, no underline? Again, not unless you’re working with an author whose field requires it. Otherwise, some authors will use underlining when they should be using italic — a holdover from the days of the typewriter.
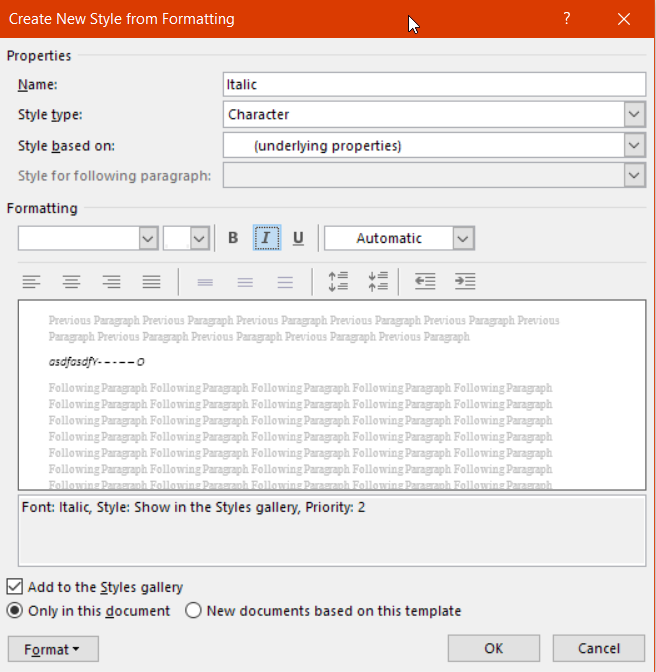
Now you need to add the character styles to your document. Here’s how:
- For the time being, stop enforcing protection on the document. Otherwise, you won’t be able to create a new style. You remember your password, right?
- Click the little arrow at the bottom right of Home > Styles to open the Styles task pane on the right.

- At the bottom of the task pane, click the little New Style icon on the bottom left.
- Give your style a name, such as Italic.

- In the box labeled “Style type,” click the dropdown arrow and select Character. This is key to making this work.
- Under Formatting, click the Italic button.
- Click the OK button.
- Repeat the process for any other character styles your authors will need.
- Again enforce protection for the document.

A side benefit to using character styles is that they can be imported into InDesign, where they can be set to use whatever formatting is needed — something that isn’t possible with directly applied formatting like italic or bold.
Creating Keyboard Shortcuts
So now the character styles are available, but only from the Styles task pane. Not very convenient; your authors are going to want their CTRL + I back. Here’s how to provide it:
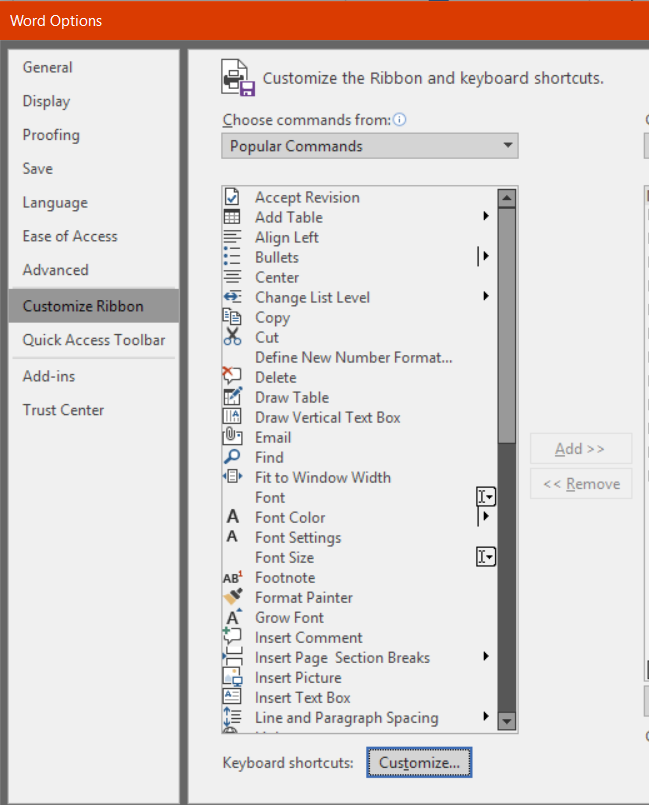
- Under the File tab, click Options > Customize Ribbon.
- Click the button labeled “Keyboard shortcuts: Customize” on the bottom left.

- In the Categories box on the left, scroll to the bottom and select Styles.

- In the Styles box on the right, select the style you created earlier (such as Italic).
- Put your cursor in the box labeled “Press new shortcut key” and, well, press a new shortcut key. Let’s use CTRL + I for our italic character style.
- Click the dropdown arrow in the box labeled “Save changes in:” and select your document. Now your keyboard shortcut will be saved in the document rather than in your Normal template. Don’t skip this step!
- Click the Assign button on the lower left.
- Click the Close button on the lower right.
- Click the OK button.
- Save your document.
- Give the document to your authors.

Now when your authors select some text and press CTRL + I, the Italic character style will be applied, so they can work without using the mouse to select the Italic style in the Styles task pane. Easy, intuitive, perfect. Rinse and repeat, with the appropriate keyboard shortcuts, for your other character styles.
At this point, you may be wondering why I didn’t just create this document for you. Stay tuned; next time I will, with a few little extras to make your life easier. But if you ever need to do all of this yourself, now you know how.
Jack Lyon (editor@editorium.com) owns and operates the Editorium, which provides macros and information to help editors and publishers do mundane tasks quickly and efficiently. He is the author of Microsoft Word for Publishing Professionals, Wildcard Cookbook for Microsoft Word, and of Macro Cookbook for Microsoft Word. Both books will help you learn more about macros and how to use them.


Thank you for the post.
Most of the styles that I’ve created are either paragraph or character ones, but occasionally I’ve created ones that are called linked, i.e., both paragraph and character attributes are part of the style. Recently I heard that this linked style is not advisable and I wondered, do you agree and if so, what kinds of problems might result?
Ariela
LikeLike
Comment by Ariela — February 7, 2018 @ 11:59 am |
Hi, Ariela. Thanks for your question. I don’t like linked styles because they’re neither fish nor fowl. I think Microsoft created them for users who (in past Word versions) selected text, tried to apply a paragraph style, and then couldn’t understand why the formatting they wanted was applied to the whole paragraph rather than just their selection.
Initially, Microsoft’s implementation of linked styles was done quite carelessly, with little testing (beginning in Word 97, if I recall correctly). When users selected text and applied a paragraph style, Word would create and apply a new style with “Char” appended to the style name. For example, if you selected text and applied the Heading 1 style, Word would create a new style named Heading 1 Char and apply *that* rather than plain old Heading 1. What Microsoft didn’t anticipate is that people would then select some text and apply the Char style, and Word would create another new style named Heading 1 Char Char. Next came Heading 1 Char Char Char, and so on. (Once you’ve started dancing the Char-Char, it’s hard to stop.)
You’ve probably noticed this not-so-helpful “feature” in various documents, and it’s notoriously difficult to clean up. My next version of Editor’s ToolKit Plus (coming *soon*) will do it for you quickly and easily, along with unlinking any styles that are linked.
Microsoft has cleaned up the Char Char Char problem in more recent versions of Word. However, even in Word 2016, if you *unlink* a linked style, you’ll get a paragraph style *and* a character style with a Char on the end. That doesn’t really hurt anything; I just find it annoying. I get really tired of Word trying to be “helpful” and doing things over which I have no control.
But here’s the real problem: If you apply a linked style (say Heading 1) to just *part* of a paragraph in Word, and if the Word document is imported into InDesign, you will get (that’s right) a *character* style named Heading 1 Char in InDesign. So now your designer or typesetter is wondering what the heck to do with that. It’s not clean. It’s not clear. It’s not professional.
Anyway, that’s probably more than you wanted to know. I like my paragraph styles to be paragraph styles and my character styles to be character styles, and never the twain shall meet. If, like me, you want to prevent linked styles, go to the bottom of Word’s Styles task pane and check the box labeled “Disable Linked Styles.”
Thanks again! I hope this sheds some light on a rather arcane and troublesome topic.
LikeLike
Comment by Jack Lyon — February 7, 2018 @ 6:43 pm |
Thank you, indeed, Jack. I am glad that you went into such detail.
I’ve been using Word 2007 since around the time it came out and I learned about styles some years after that. To tell you the truth, I don’t think I did ever notice the odd naming quirk that you mentioned, or if I did, I didn’t realize what was causing it and probably just deleted them. Until reading your post, I have always intuitively assumed that the only way to create character effects, such as bold, italics, etc., combined with paragraph features, such as indentation, spacing, etc., was to select a linked style. I was rather surprised when I checked again and just saw that my heading styles, with certain character-level effects, are all of the unlinked, paragraph variety. Now that I’m better informed, I understand why that was a good thing (that happened purely by accident).
LikeLike
Comment by Ariela — February 8, 2018 @ 6:04 am |
Thanks for this wonderfully detailed post, and the promise of even more! I’ve used the restricted/locked option for a while, plus a few cobbled-together ideas, but from this post see that I can close other aggravating ‘holes’. Great! Can’t wait for your next offering/sharing – thanks again. // Maria D’Marco
LikeLike
Comment by TigerXGlobal (@TigerXGlobal) — February 8, 2018 @ 11:35 am |
Can this be applied to an existing MS from an author? Would it work, e.g., by creating a new blank document with Restrict Editing, and then copying and pasting all of the author’s original article into the blank Restrict Editing document?
That way one could then copy edit their article as submitted, and return it for approval to the author with the Restrict Editing conditions enforced?
LikeLike
Comment by Timothy DeVinney — February 8, 2018 @ 11:47 am |
Hi, Timothy. Yes, you could do exactly what you described. You could also restrict editing on the author’s original document rather than creating a new one.
LikeLike
Comment by Jack Lyon — February 8, 2018 @ 12:57 pm |
Thanks a lot, Jack. That is exactly what I needed… but there’s no way (just with only one style/shortcut) to turn on AND off italics, for example? Maybe we a need another one “clearing format” style or so (not the “delete all” style!) better than one to turn on italics / bold / etc., and one for turn off each one.
Thanks again.
Antonio Martín,
Madrid – Spain
LikeLike
Comment by antonio martín — February 9, 2018 @ 8:20 am |
By the way, when I apply in a word my new “Just italic” Char style, and later “Just bold”… do exactly what I have asked for: turns that word on bold, but loss his italic. I guess I need an extra “Just bold&italic” style, isn’t?
LikeLike
Comment by antonio martín — February 9, 2018 @ 8:37 am |
Hi Antonio. Yes, you need a “Just bold&italic” style as well as “Just bold” and “Just italic.” The new Editor’s ToolKit Plus (coming *soon*) will take of all such combinations automatically and transparently. Select some text, press CTRL + I, then CTRL + B, then CTRL + U, and you’ll get italic bold underline–all in one character style. Press CTRL + I again, and the italic will be removed, leaving just bold underline–a really slick implementation of character styles, even if I do say so myself. 🙂
LikeLiked by 1 person
Comment by Jack Lyon — February 9, 2018 @ 9:22 am |
Antonio, you’re right–there’s no way (without a macro) to turn italics on AND off with a keyboard shortcut toggle. You can clear any existing formatting by selecting the text and pressing CTLR + SPACEBAR. But see my comment below.
LikeLiked by 1 person
Comment by Jack Lyon — February 9, 2018 @ 9:25 am |
And by “below,” I meant “above.” 🙂
LikeLike
Comment by Jack Lyon — February 9, 2018 @ 9:26 am |
Thanks again, Jack. I really hope see soon the new features in the new edition of Editor’s ToolKit Plus.
LikeLike
Comment by antonio martín — February 9, 2018 @ 9:53 am |