Part I introduced the preediting steps (Steps 1 to 3). Part II discussed the remaining two preediting steps (Steps 4 and 5) and then discussed the first editing step (Step 6) in my editing process, which is editing the references. Part III finishes the editing process with Step 7, which focuses on editing the main text.
Step 7: Editing the Text
I use a three-monitor desktop system for editing. When I edit the text, I have the primary document open on the first monitor, the online stylesheet open on the middle monitor, and other needed documents, such as the references, open on the right-hand monitor. I also have open several of the EditTools tools I use while editing (see below for an example), such as Bookmarks, Click List, Reference # Order Check (if the references are numbered rather than name–date style), and Toggle Specialty Manager. Once I start adding author queries using the Insert Query macro, I may add Comment Editor to the open tools mix.

Sample of EditTools Macros
I keep these tools open on the desktop because I use them often. Bookmarks are both navigational aids and tracking aids. The Reference # Order Check provides a way to track reference callouts and renumbering them if renumbering is required. Click List provides a quick-and-easy method for inserting text or symbols. Toggle Specialty Manager lets me add to the active Toggle list new project-specific terms that I encounter while editing.
As I edit, I know that decisions will need to be made. For example, should I let an acronym stand or should I replace it with its spelled-out version? If the client has a rule governing usage, I need to be able to apply it. So, for example, when I come across travel risk management (TRM), I run the ESCR (Enhanced Search, Count, & Replace) macro, shown below, to determine how many times in the document the phrase travel risk management appears and how many times TRM appears.
ESCR looks for these variations (I can add additional ones)

ESCR macro
and provides this report

ESCR Report
Using the report screen, I can make changes to the text. For example, in the above report, travel risk management appears 10 additional times in the document. I can also see that the acronym TRM is often used. Consequently, for consistency, assuming that TRM is acceptable to the client, I need to change travel risk management to TRM. Thus I type TRM in fields #1 and #2 and I check the highlight box (#3) next to TRM. I also leave TRM3 as it is, because that is different from TRM and needs to be defined and searched for separately. Clicking OK then lets the macro change all 11 instances of travel risk management to TRM with tracking on. The macro also yellow highlights the 37 instances of TRM. As I edit the document now, when I see the yellow-highlighted TRM, I know that it has already been defined earlier in the chapter and that the decision was made to use the acronym rather than the phrase. Had the report come back saying there were only two instances of TRM, then the decision might have been to use the spelled-out version instead of the acronym.
If travel risk management (TRM) is not in my Word Specialty dataset, I add it (I also add it to the online stylesheet if it is not already there), using the Acronym/Phrase entry system (shown below).
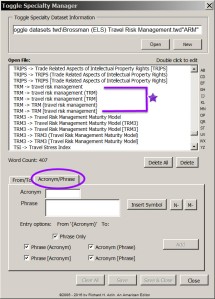
Toggle Word Acronym/Phrase entry system
In the future, if I come across an instance of TRM that needs to be spelled out, I can click Toggle Word and choose from among several options, as shown here:

Toggle Word Choice Menu
If I need to query the author or make a comment to the compositor, I use Insert Query (see below). With Insert Query, I can call upon a previously written query that I have saved, or create a brand-new query, which I can save, or not, to the dataset for future reuse.

Insert Query
If I want to alter a query for any reason, or even if I want to delete a query — whether it is located 20 pages ago or where I currently am — I use Comment Editor, shown here:
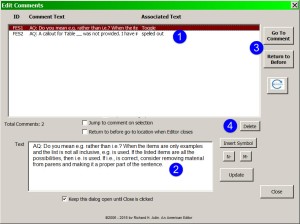
Comment Editor
Comment Editor lists all of the queries I have inserted in the document (#1). There is no limit to the number of queries Comment Editor will list. One of the nice things about Comment Editor is that I do not need to go to the page where the query is located to edit it. I select the query that I want to edit and the complete text of the query appears in the Text box (#2), where I can edit or completely rewrite it. If I want to go to the query in the manuscript, I can click Go To Comment (#3). That will take me to the query’s location. To return to where I was in the document, I click Return to Before (the name is odd but it refers to the bookmark that was inserted). I can also delete a query by selecting it and clicking Delete (#4). With Comment Editor I do not need to spend time trying to locate the query I want to modify, going to it, and then returning to where I was in the document.
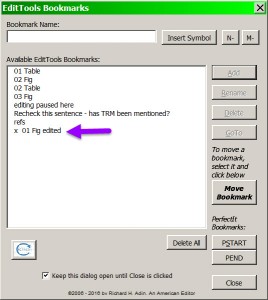
As I indicated earlier, I use the Bookmarks macro as a way to track figures, tables, and text boxes. I also use it to mark items I need to return to for some reason. Unlike Word’s Bookmark feature, EditTools’ Bookmarks lets you use descriptive language. That helps greatly when, for example, you want to bookmark a sentence to recheck. With EditTools’ Bookmarks you could insert “Recheck this sentence – has TRM been mentioned?”, as shown here:

Bookmarks
I use the Bookmarks renaming function for tracking. If Figure 1 has been called out in the text and I have edited the figure and its caption, I rename the bookmark. I select the bookmark and click Rename (#1), which brings up the renaming dialog shown here:

Bookmarks Renaming Dialog
The renaming dialog tells me which bookmark I am renaming (#1). Because I have selected certain items to be the defaults (#2 and #3), the new name automatically appears in the To field (#4). I could choose a different prefix or suffix, add new ones, change the defaults, and even choose None (meaning either no prefix or no suffix is to be used). If the default is what I want, I click OK and the change is made, as shown below, but the bookmark remains in the same location.
After Renaming
When I am done editing the document, I bring the reference file back into the main document using Word’s Insert File feature. I then run one last EditTools macro, Remove All Highlighting, which is found in the Other menu on the Highlight menu, as shown here:

Remove All Highlighting
Running that macro will remove all the highlighting I have added during editing. It has no effect on Track Changes, just on the highlighting. If I need to keep certain highlighting, I instead run the Choose Highlighting To Remove macro. When I run that macro, it searches through the document to determine what highlighting colors are used in the document and lists them, as shown here:

Choose Highlighting to Remove
I select the colors I want removed and click OK.
That’s pretty much the process I follow and the way I use many of the EditTools macros. I haven’t mentioned several macros, because they are not part of my usual editing process. I do use them, just not with the frequency of those described above. Under the right circumstances, these other EditTools macros can be very useful.
If you are a user of EditTools, share your experience with EditTools and tell us which macros you use and when you use them.
Richard Adin, An American Editor
_______________
Looking for a Deal?
You can buy EditTools in a package with PerfectIt and Editor’s Toolkit Plus 2014 at a special savings of $78 off the price if bought individually. To purchase the package at the special deal price, click Editor’s Toolkit Ultimate.

EditTools & My Editing Process: Part III
Tags: Bookmarks, Click List, Comment Editor, editing process, EditTools, EditTools in the editing process, ESCR, Reference # Order Check, Toggle
Part I introduced the preediting steps (Steps 1 to 3). Part II discussed the remaining two preediting steps (Steps 4 and 5) and then discussed the first editing step (Step 6) in my editing process, which is editing the references. Part III finishes the editing process with Step 7, which focuses on editing the main text.
Step 7: Editing the Text
I use a three-monitor desktop system for editing. When I edit the text, I have the primary document open on the first monitor, the online stylesheet open on the middle monitor, and other needed documents, such as the references, open on the right-hand monitor. I also have open several of the EditTools tools I use while editing (see below for an example), such as Bookmarks, Click List, Reference # Order Check (if the references are numbered rather than name–date style), and Toggle Specialty Manager. Once I start adding author queries using the Insert Query macro, I may add Comment Editor to the open tools mix.
Sample of EditTools Macros
I keep these tools open on the desktop because I use them often. Bookmarks are both navigational aids and tracking aids. The Reference # Order Check provides a way to track reference callouts and renumbering them if renumbering is required. Click List provides a quick-and-easy method for inserting text or symbols. Toggle Specialty Manager lets me add to the active Toggle list new project-specific terms that I encounter while editing.
As I edit, I know that decisions will need to be made. For example, should I let an acronym stand or should I replace it with its spelled-out version? If the client has a rule governing usage, I need to be able to apply it. So, for example, when I come across travel risk management (TRM), I run the ESCR (Enhanced Search, Count, & Replace) macro, shown below, to determine how many times in the document the phrase travel risk management appears and how many times TRM appears.
ESCR looks for these variations (I can add additional ones)
ESCR macro
and provides this report
ESCR Report
Using the report screen, I can make changes to the text. For example, in the above report, travel risk management appears 10 additional times in the document. I can also see that the acronym TRM is often used. Consequently, for consistency, assuming that TRM is acceptable to the client, I need to change travel risk management to TRM. Thus I type TRM in fields #1 and #2 and I check the highlight box (#3) next to TRM. I also leave TRM3 as it is, because that is different from TRM and needs to be defined and searched for separately. Clicking OK then lets the macro change all 11 instances of travel risk management to TRM with tracking on. The macro also yellow highlights the 37 instances of TRM. As I edit the document now, when I see the yellow-highlighted TRM, I know that it has already been defined earlier in the chapter and that the decision was made to use the acronym rather than the phrase. Had the report come back saying there were only two instances of TRM, then the decision might have been to use the spelled-out version instead of the acronym.
If travel risk management (TRM) is not in my Word Specialty dataset, I add it (I also add it to the online stylesheet if it is not already there), using the Acronym/Phrase entry system (shown below).
Toggle Word Acronym/Phrase entry system
In the future, if I come across an instance of TRM that needs to be spelled out, I can click Toggle Word and choose from among several options, as shown here:
Toggle Word Choice Menu
If I need to query the author or make a comment to the compositor, I use Insert Query (see below). With Insert Query, I can call upon a previously written query that I have saved, or create a brand-new query, which I can save, or not, to the dataset for future reuse.
Insert Query
If I want to alter a query for any reason, or even if I want to delete a query — whether it is located 20 pages ago or where I currently am — I use Comment Editor, shown here:
Comment Editor
Comment Editor lists all of the queries I have inserted in the document (#1). There is no limit to the number of queries Comment Editor will list. One of the nice things about Comment Editor is that I do not need to go to the page where the query is located to edit it. I select the query that I want to edit and the complete text of the query appears in the Text box (#2), where I can edit or completely rewrite it. If I want to go to the query in the manuscript, I can click Go To Comment (#3). That will take me to the query’s location. To return to where I was in the document, I click Return to Before (the name is odd but it refers to the bookmark that was inserted). I can also delete a query by selecting it and clicking Delete (#4). With Comment Editor I do not need to spend time trying to locate the query I want to modify, going to it, and then returning to where I was in the document.
As I indicated earlier, I use the Bookmarks macro as a way to track figures, tables, and text boxes. I also use it to mark items I need to return to for some reason. Unlike Word’s Bookmark feature, EditTools’ Bookmarks lets you use descriptive language. That helps greatly when, for example, you want to bookmark a sentence to recheck. With EditTools’ Bookmarks you could insert “Recheck this sentence – has TRM been mentioned?”, as shown here:
Bookmarks
I use the Bookmarks renaming function for tracking. If Figure 1 has been called out in the text and I have edited the figure and its caption, I rename the bookmark. I select the bookmark and click Rename (#1), which brings up the renaming dialog shown here:
Bookmarks Renaming Dialog
The renaming dialog tells me which bookmark I am renaming (#1). Because I have selected certain items to be the defaults (#2 and #3), the new name automatically appears in the To field (#4). I could choose a different prefix or suffix, add new ones, change the defaults, and even choose None (meaning either no prefix or no suffix is to be used). If the default is what I want, I click OK and the change is made, as shown below, but the bookmark remains in the same location.
After Renaming
When I am done editing the document, I bring the reference file back into the main document using Word’s Insert File feature. I then run one last EditTools macro, Remove All Highlighting, which is found in the Other menu on the Highlight menu, as shown here:
Remove All Highlighting
Running that macro will remove all the highlighting I have added during editing. It has no effect on Track Changes, just on the highlighting. If I need to keep certain highlighting, I instead run the Choose Highlighting To Remove macro. When I run that macro, it searches through the document to determine what highlighting colors are used in the document and lists them, as shown here:
Choose Highlighting to Remove
I select the colors I want removed and click OK.
That’s pretty much the process I follow and the way I use many of the EditTools macros. I haven’t mentioned several macros, because they are not part of my usual editing process. I do use them, just not with the frequency of those described above. Under the right circumstances, these other EditTools macros can be very useful.
If you are a user of EditTools, share your experience with EditTools and tell us which macros you use and when you use them.
Richard Adin, An American Editor
_______________
Looking for a Deal?
You can buy EditTools in a package with PerfectIt and Editor’s Toolkit Plus 2014 at a special savings of $78 off the price if bought individually. To purchase the package at the special deal price, click Editor’s Toolkit Ultimate.
Share this: