An American Editor

May 2, 2016

Lyonizing Word: Using the “Find What Expression” Wildcard

by Jack Lyon

Rich Adin recently sent me an interesting challenge. He was using his EditTools Journal feature to mark journal titles in references. The power behind that useful tool comes from lists of incorrectly styled references with corresponding correctly styled references. He creates a separate list for each reference style. The list he sent me was for AMA style, in which the reference uses the PubMed abbreviation followed by a period. It looks like something like this:

A Gesamte Exp Med, | cyan -> Z Gesamte Exp Med.
A Gesamte Exp Med. | cyan -> Z Gesamte Exp Med.
A JR | cyan -> AJR Am J Roentgenol.
A M A Arch Ind Hyg Occup Med. | green
A of LTC | cyan -> Ann Longterm Care.
A of LTC, | cyan -> Ann Longterm Care.
A of LTC. | cyan -> Ann Longterm Care.
A&D | cyan -> Aging Dis.
A&D, | cyan -> Aging Dis.
A&D. | cyan -> Aging Dis.
A. M. A. Arch. Derm | cyan -> AMA Arch Derm.
A. M. A. Arch. Derm, | cyan -> AMA Arch Derm.
A. M. A. Arch. Derm. | cyan -> AMA Arch Derm.

The text to the left of the pipe (|) is how the entry might (incorrectly) appear in the references supplied by the author; the entry to the right is how it should appear. Each entry includes a color, either cyan or green, which tells the program to use that color in highlighting the reference.

Rich knew that some of the entries included duplicates, like this:

Arch Intern Med. | cyan -> Arch Intern Med.

In other words, the item on the left was identical to the item on the right, which meant that it shouldn’t be marked. That also meant the entry didn’t need to be on the list at all. But the real problem was that Rich’s reference list included more than 117,000 entries!

Rich’s challenge? Use wildcard find and replace to remove such entries, thus shortening the list and preventing unnecessary marking.

First, let’s look at that entry again to see what we might need to do:

Arch Intern Med. | cyan -> Arch Intern Med.

There’s a pipe symbol (|) in the middle, which gives us something to differentiate the left side of the entry from the right side of the entry. So we might set up the first part of our wildcard string to look like this:

([!^013]@) |

That tells Word to find any character except a carriage return, an unspecified number of times, until it comes to a space followed by a pipe symbol.

The wildcard for a carriage return is:

^013

The wildcard for “except” is:

!

And we have to put both of those in square brackets so Word knows that’s a set of characters. (After all, [!^013] finds any character, no matter what it is, unless it’s a carriage return.)

The wildcard for “an unspecified number of times” is:

@

Finally, we have to put all of that into a “group” by enclosing it with parentheses. And that’s important. You’ll see why in a minute.

Testing that part of our search string, we see that, yes, indeed, it finds the following:

Arch Intern Med. |

In fact, it finds the beginning of each entry, which is just what we want.

Now let’s look at the right side of our entry:

 cyan -> Arch Intern Med.

You can’t see it here, but there’s a space in front of “cyan” — the space that follows the pipe symbol. So we need to include that space in our search string, along with the word “cyan” (in the following examples, I use [space] to represent a space so you can see it; [space] should not actually be entered; use a real space created by pressing the space bar):

[space]cyan

There’s also a space after cyan, so we’ll need to include that as well.

[space]cyan[space]

That needs to be followed by a hyphen, a right angle bracket, and yet another space, like this:

[space]cyan[space]-\>[space]

But now you may be wondering why I put a backslash in front of the angle bracket. It’s because the angle bracket is itself a wildcard (a subject for another day), so we need to tell Word we’re using it as an actual character, which is what the backslash does.

Finally, the rest of our search string looks like this:

\1^013

This part of the string —

\1

— is the “Find What Expression” wildcard, which is what this article is about, and it certainly took us a long time to get to it!

Remember back when we grouped the very first part of our search string in parentheses?

([!^013]@)

That “group” is the “expression” that the \1 wildcard represents. In algebraic terms:

\1 = ([!^013]@)

And that means \1 will find whatever is found by the ([!^013]@) expression, which, my friend, is extremely cool, because it will allow us to weed out the duplicate entries on our reference list—entries like this:

Arch Intern Med. | cyan -> Arch Intern Med.

Now, for the first time, let’s look at our entire search string:

([!^013]@) | cyan \-\> \1^013

By now, you probably understand this quite well. The string finds any characters except a carriage return until it comes to a space and a pipe symbol; then it finds a space, the word “cyan,” and another space, followed by a hyphen, a right angle bracket, and a space. Finally (and most importantly), it finds whatever was found by the parenthetical group, followed by a carriage return.

Now we simply need to make sure that Word’s “Replace with” box is empty and click “Replace All.” All of those unnecessary entries will be deleted. (We’ll need to repeat with “green” for the entries that don’t include “cyan.”)

Which would you rather do: Find and delete such entries manually (with just 117,000 to look through) or have Word do it automatically?

That’s the power of the “Find What Expression” wildcard. In future articles, I’ll show you more uses for this wonderful tool, along with other Word wildcards.

Jack Lyon (editor@editorium.com) owns and operates the Editorium, which provides macros and information to help editors and publishers do mundane tasks quickly and efficiently. He is the author of Microsoft Word for Publishing Professionals, Wildcard Cookbook for Microsoft Word, and of Macro Cookbook for Microsoft Word. Both books will help you learn more about macros and how to use them.

March 21, 2016

Lyonizing Word: But Which Styles?

by Jack Lyon

In my previous article, Lyonizing Word: Taming Styles in Microsoft Word, I explained how to make Microsoft Word display only the paragraph styles you want to use. But that raises an important question: Which paragraph styles do you want to use?

If you’re writing a simple business letter, the only style you may need is Word’s default of Normal. But if you’re editing a book, things immediately become much more complicated. Consider: What different kinds of text exist in a book? Let’s start with the title page; at a minimum, it includes the following elements:

  • Title
  • Author
  • Publisher

It may also include these:

  • Subtitle
  • Publication date

And that means you’ll probably need a paragraph style for each one of those. Why? Because the designer may want to format each element differently. Even if that ends up not being the case, you’ve at least allowed for the possibility. In addition, using a different style for each element makes it possible to use those elements as metadata, and that can be important in electronic publishing. Back in the late 1990s, I was involved in the production of an enormous electronic library. Most of the books were already styled with—that’s right—Title, Author, and Publisher, making it fairly easy to access those elements through a database and thus allow the user to sort books by title, author, and so on.

What styles will you need as you get into the book’s chapters? You might want to pull a couple of books off your shelves and see. You’ll probably find that you’ll need (at a minimum):

  • Chapter number
  • Chapter title
  • Body text

And as you get deeper into the book, you may need some of the following:

  • Block quotation
  • Poetry
  • Subheading
  • Subsubheading

Most books include a multitude of other elements, such as:

  • Dedication
  • Epigraph
  • Caption
  • Notes
  • Bibliography

And on and on and on.

Do you really need all of this detail? Yes, you do. Even if epigraphs and captions are going to look the same (e.g., both will use left-justified 10-point New Century Schoolbook), you as an editor, working in an editorial capacity, shouldn’t be thinking about how epigraphs and captions will look; you should be thinking about whether a specific bit of text is an epigraph or a caption and applying the metadata (a style) that marks it as such. Otherwise, the designer and typesetter won’t know for sure which text they need to format in a certain way. In addition, applying the proper metadata (styles) to epigraphs and captions makes them accessible and manipulable in various ways for later electronic publishing.

Can’t you just let the designer or typesetter take care of all this styling? No, you can’t. Deciding what text should be marked with which style is an editorial matter, not a design or typesetting one. Is this bit of text a subheading or a subsubheading? Should that bit of text be run in or pulled out as a block quotation? Is this line really an epigraph or just part of the body text? Is that line a chapter title, or should it be relegated to a subheading? All of these are editorial decisions; they have to do with what the text is and with what the text means.

Design decisions, on the other hand, have to do with how the text looks. The editor has styled this line as an epigraph. Should it be set in Comic Sans? (Horrors!) Should it be set in italics? Should it be a smaller point size than body text? Should it be centered?

So what styles do you really need? It depends on the book. And there’s no way to know without actually going through the book to find out. I tend to do this as I work, creating new styles as the need arises. Hey, that’s a poem! Guess I’ll need a poetry style (which I then create and apply).

And what should my poetry style look like? For editorial purposes, it doesn’t matter, as long as I can tell that the poetry style has been applied. For example, I might set up the style to be indented half an inch on both sides, with the text color set to blue. When the designer and typesetter bring the text into InDesign, they can redefine the style any way they like. But for now, I can tell that I’ve styled that text as poetry, which, for me as an editor, is all that matters.

In this article, I’ve assumed that you’re creating the styles you need to use, as that’s how I usually work. But for the most part, editors who work for publishers don’t need to do that. Publishers often have their own sets of styles that they require editors to use, and these styles are usually stored in a Word template. For example, you can download the Springer template and the Wiley template. Both templates are well worth looking at, just so you can get an idea of what publishers are looking for in the way of styled manuscripts. Wiley provides additional information in an online article “Applying Formatting Styles.”

You may also be interested in my Author Tools Template, which is a collection of styles that make it easy for authors (and editors) to produce properly styled manuscripts, which means that publishers can then use those manuscripts without having to restyle the text.

In addition, if you’re working with styles as I’ve explained in this article, you owe it to yourself to check out the Style Inserter in Rich Adin’s EditTools. This is a slick feature that overcomes the problems with styles that I discussed in my previous article (see Lyonizing Word: Taming Styles in Microsoft Word) and makes it easy to apply publisher styles to a manuscript.

\bodytext\It’s worth noting that some publishers don’t use styles at all. Instead, they require editors to mark up text with publisher-supplied codes like the one at the beginning of this paragraph. In that case, it’s important not to type the codes in by hand, as doing so can easily lead to errors. Instead, editors should use something like Code Inserter, which is included in EditTools.

In the 1980s, I worked on the Penta system, which used such codes extensively. During the 1990s, however, I switched to WordPerfect 6.0 and finally to Microsoft Word, and marking text with styles became a more intuitive way to work.

So what styles do I routinely use today? Here’s the minimal list, which I use in all of the books I publish at Waking Lion Press:

  • Half-Title
  • Title
  • Subtitle
  • Author
  • Publisher
  • Copyright
  • Dedication
  • Epigraph
  • Epigraph Source
  • Part
  • Chapter
  • Section
  • Subsection
  • Block quote
  • Poem
  • Poem Heading
  • Poem Source
  • Bibliography
  • Notes

How about you? What styles do you routinely use? And do you have any tips on how to use them? If so, I’d love to hear from you.

Jack Lyon (editor@editorium.com) owns and operates the Editorium, which provides macros and information to help editors and publishers do mundane tasks quickly and efficiently. He is the author of Microsoft Word for Publishing Professionals, Wildcard Cookbook for Microsoft Word, and of Macro Cookbook for Microsoft Word. Both books will help you learn more about macros and how to use them.

February 29, 2016

Lyonizing Word: Taming Styles in Microsoft Word

by Jack Lyon

Microsoft Word includes a powerful feature for marking the various levels of a manuscript (such as headings, block quotations, poetry, and so on). That feature is styles, which are valuable for many reasons, including:

  • They make it possible to reformat a whole document simply by redefining styles or applying a different template using those styles.
  • They make it possible to find and replace only text using a certain style. For example, you might want to find source citations by searching for parentheses in text styled as block quotations.
  • They make it possible to generate a table of contents based on specified styles.

So styles are very useful. The problem is that Microsoft Word, in its usual “helpful” way, tries to manage which styles are available, in which document, and how those styles can be accessed. Finally growing tired of this nonsense, I decided to take the matter firmly in hand by writing this article.

My first gripe is that Word decides which styles to show in the Styles area of the Home ribbon, which decision seems to be based on nothing that makes any sense. Right now, it’s showing the following:

Quick Style Gallery

Quick Style Gallery

Of the styles available, I use Normal and Heading 1. But Strong? Subtle Emphasis? Intense Emphasis? Who makes this stuff up? Not an actual writer or editor, that’s for sure. So the first thing to do is get rid of the icons for the styles I never use:

  1. Right-click the icon (such as that for Strong).
  2. Click “Remove from Quick Style Gallery” (which, evidently is what the Styles area is called).
Remove from Quick Style Gallery

Remove from Quick Style Gallery

Now, the question is, when I restart Word or create a new document, does the Strong icon come back? Let’s find out. (Now restarting Word.)

Ha! It’s gone! But what happens if I create a new document? (Now creating a new document.)

Shoot, Strong is back again. So we can conclude that removing a style from the Quick Style Gallery applies only to the document in which we remove the style.

I could get rid of Strong and then save what I’ve done as a Quick Style Set:

Save as Quick Style Set

Save as Quick Style Set

But I’d like to get rid of Strong once and for all. How can I do that?

Well, I’ll start by showing Word’s task pane (by clicking the little arrow at the bottom right of the Styles area):

Word's task pane

Word’s task pane

Now I should be able to click the drop-down arrow next to Strong and delete it, right? Nope. Word won’t let me. How annoying!

Delete Strong

Delete Strong

Well, then, where does the Strong style live? In Word’s Normal.dotm template, of course. Can I get rid of it there? I open the folder where the template lives, which on my computer is here:

C:\Users\Jack\AppData\Roaming\Microsoft\Templates

Then I open the Normal.dotm template. Now can I delete the Strong style?

No, I can’t; same problem as before. Word really, really, really wants to keep its built-in styles — which is why they’re called “built-in,” I guess. So my only recourse is to (1) set how the style will be displayed and then (2) tell Word which styles to display. Here’s how:

  1. Open the Normal.dotm template, which is where your default styles are stored.
  2. Under Style Pane Options (the blue “Options” link at the bottom of the task pane), set “Styles to Show” as “Recommended.” Select “New documents based on this template.”
Show styles as recommended

Show styles as recommended

  1. Under Manage Styles (the third button at the bottom of the task pane), set all styles to “Hide” or “Hide until used” except those you want to show. (Even now, Word won’t let you hide everything.) Select “New documents based on this template.”
Hide Strong

Hide Strong

  1. Make any other adjustments you’d like, such as the order in which the styles will appear in the task pane.
  2. Save and close the Normal.dotm template.

After you’ve done that, every time you start Word or create a new document, you’ll get only the styles you want to see. I think. I hope. Maybe.

How about you? Do you have any helpful hints about how to tame Word’s styles? If so, I’d love to hear from you.

Jack Lyon (editor@editorium.com) owns and operates the Editorium, which provides macros and information to help editors and publishers do mundane tasks quickly and efficiently. He is the author of Microsoft Word for Publishing Professionals, Wildcard Cookbook for Microsoft Word, and of Macro Cookbook for Microsoft Word. Both books will help you learn more about macros and how to use them.

January 18, 2016

The Zen of Editing: Tales of the Pen Master

by Jack Lyon

If you’ve ever read much about Zen Buddhism, you’re probably aware of its strange but wonderful stories of masters, monks, and enlightenment. Here is an example:

The Emperor asked Zen Master Gudo, “What happens to a man of enlightenment after death?”

“How should I know?” replied Gudo.

“Because you are a master,” answered the Emperor.

“Yes,” Gudo said, “but not a dead one.”

In that spirit, here are some tales not of the Zen master but rather of the Pen master, whose job is to open the minds of editors everywhere. As is usual in Zen tradition, each story is followed by enlightened commentary.

Following the Precepts

An assistant editor went before the Pen master, saying, “Lo, these many years I have faithfully followed the precepts in Garner’s Modern American Usage and The Chicago Manual of Style. Why am I not yet enlightened?”

“Because,” said the master, “you have faithfully followed the precepts in Garner’s Modern American Usage and The Chicago Manual of Style.”

In true Zen spirit, this story illustrates the importance of following the rules and not following the rules. Editors have “rules” for an important reason — to make sure that the author’s intended meaning is clearly communicated to readers in a consistent, coherent way. But blindly following the “rules” can also result in miscommunication. That is why, since its initial publication in 1906, The Chicago Manual of Style has included the following disclaimer: “Rules and regulations such as these, in the nature of the case, cannot be endowed with the fixity of rock-ribbed law. They are meant for the average case, and must be applied with a certain degree of elasticity.”

Editing Is More Than Mechanics

One day the Pen master was passing an assistant’s cubicle.

“Oh, master,” said the assistant, “I’m so glad you came by. Look at this wonderful new editing software. It flags incomplete sentences, finds dangling modifiers, and much more. With this software, the manuscript practically edits itself!”

“Interesting,” said the master. “How does it know when a paragraph should be deleted?”

Editing is not simply a matter of mechanics; if it were, a computer could do it. Fortunately for editors, a human mind is required. At the Editorium, I create and sell Microsoft Word add-ins to help editors do their work. These add-ins, to some degree, automate parts of the editing process. But in the end, cognitive judgment is needed to decide which parts should be automated and which should not, and if any of the automated parts should in some cases be overridden. In addition, there are many parts of the process that simply cannot be automated. Language is complex and subtle, and something as small as a misplaced comma can literally make the difference between life and death (as in a medical journal).

If It Ain’t Broke, Don’t Fix It

An assistant editor was reading a manuscript that had already been gone over by the Pen master. To her surprise, the manuscript contained not a single correction.

Questioning the master about this, the assistant remarked, “You said you had edited this manuscript, but it contains no corrections at all.”

“Nevertheless,” said the master, “now that I’m finished with it, the manuscript is perfect.”

What if you went completely through a manuscript without making a single correction, because, as far as you could tell, no corrections were needed? Would you have done your job? I believe that you would have. An editor’s job is not to make corrections; an editor’s job is to make sure the writing is clear, and if it is, no corrections are needed. Of course, in real life, that is probably never the case. But it’s an interesting thing to think about.

Something Is Always Broke

An assistant brought a new book, hot off the press, to the Pen master. “Master, look!” she said. “The book is beautiful! The cover is bright and attractive, the marketing copy is appealing, the typography is excellent. Surely this is the finest book we have ever published.”

The master opened the book to a random page. “Read the first line,” he said.

“‘When this matter came to the attention of the pubic …’”

These are the things that haunt our lives. I started my publishing career as a proofreader at a university press. On prominent display in our office was a book on whose cover the title had been misspelled — a reminder of the need for constant vigilance on every part of the book during every part of the publishing process. At a later job, thousands of copies of a publication ended up being shredded because of a photograph that should not have been included. So pay attention! As a famous Zen story (a real one) teaches:

A student said to Master Ichu, “Please write for me something of great wisdom.”

Master Ichu picked up his brush and wrote one word: “Attention.”

The student said, “Is that all?”

The master wrote, “Attention. Attention.”

The student became irritable. “That doesn’t seem profound or subtle to me.”

In response, Master Ichu wrote simply, “Attention. Attention. Attention.”

In frustration, the student demanded, “What does this word attention mean?”

Master Ichu replied, “Attention means attention.”

(Charlotte Joko Beck, Nothing Special: Living Zen. [New York: HarperCollins, 1993], 168.)

Editing Reveals Meaning

After receiving his edited manuscript for review, the author was furious. “How dare you!” he said to the Pen master. “This manuscript is covered with corrections.”

“You must not look at the corrections,” said the master. “You must look at the meaning behind the corrections.”

Here we have the opposite case from the one above, where nearly everything needs fixing. Again, however, the process is not about correcting “errors”; the process is about making sure that the author is clear — and not just to the reader. An editor is not out of place to say to an author, “You seem to be saying this, but what I think you really mean is this. Is that right?” It’s all about meaning.

It is not the editor’s place, however, to add meaning, to “improve” the author’s ideas. Editors who feel the need to do so should write their own books.

Context Matters

An editor and a designer were arguing about which was more important, layout or words.

“The layout is finished,” said the designer. “You’ll need to edit the wording to fit.”

“The editing is finished,” said the editor. “You’ll need to change the design to accommodate.”

Finally, they took their argument before the Pen master, who looked at them severely. “What matters is neither the design nor the words,” he said. “What matters is the meaning.”

“And how does one know the meaning?” asked the editor.

“By looking at the design and the words.”

And this is what makes publishing so interesting — and so difficult. The meaning of a word or a sentence or a paragraph always depends on what’s going on around it. Ideas are not fixed; as we change the words or design of a publication, meanings change too, so we must be constantly on our guard.

A student once asked Zen master Shunryu Suzuki, “Can you reduce Buddhism to one phrase?” His reply was spontaneous and profound: “Everything changes.” (David Chadwick, Crooked Cucumber: The Life and Zen Teachings of Shunryu Suzuki [New York: Broadway Books, 1999], xii.)

Here’s another of my Pen Master stories that illustrates the same principle:

One day an assistant came to the Pen master for help with an awkward sentence.

“No matter what I do, I can’t seem to fix this sentence,” he said. “If I delete a word, the sentence no longer makes sense. If I add a word, the sentence seems bloated.”

“If fixing the sentence doesn’t fix it,” the master replied, “perhaps it doesn’t need fixing.”

The next day, the assistant came to the Pen master for help with another awkward sentence.

“Again,” he said, “I can’t seem to fix this sentence. If I delete a word, the sentence no longer makes sense. If I add a word, the sentence seems bloated.”

The master picked up his pen and deleted the sentence entirely. “There,” he said. “Now the fixing is fixed.”

The following day, after a sleepless night, the assistant came again to the Pen master.

“The first day, you said the sentence didn’t need fixing. The next day, you simply deleted the sentence. How does one know when to fix, when to stet, and when to delete?”

The master looked at him shrewdly. “It doesn’t depend on the sentence; it depends on the sentences around it.”

Thinking to outwit the master, the assistant replied, “And what if there are no sentences around it? Then how does one know what to do?”

The master gave a great sigh. “One doesn’t,” he said.

Sometimes It Doesn’t Matter

An assistant came to the Pen master for advice about reconciling proofs.

“One proofreader fixes an error one way; another fixes the error another way,” said the assistant. “Which way is right?”

“Neither is right; neither is wrong,” said the master. “What matters is that the error was fixed.”

Editors sometimes argue about the “right” way to fix something. But in the end, it may not matter as long as the meaning is clear. There are other considerations, of course, such as elegance, euphony, and even beauty. But these are in the realm of enlightenment beyond enlightenment.

What Is Perfection?

An author brought her manuscript to the Pen master. “This new book is my masterpiece,” she said. “It needs no editing at all; it is perfect just as it is.”

“Truly the book in your mind is perfect,” said the master. “But this is not the book in your mind.”

The real job of an editor is to capture what an author means to say and convey that meaning intact into the mind of the reader. This, of course, is impossible in reality, but that doesn’t keep us from trying, and sometimes we may come close. As the Zen masters say, “Practice itself is enlightenment.”

Subhuti was Buddha’s disciple. He was able to understand the potency of emptiness, the viewpoint that nothing exists except in its relationship of subjectivity and objectivity.

One day Subhuti, in a mood of sublime emptiness, was sitting under a tree. Flowers began to fall about him.

“We are praising you for your discourse on emptiness,” the gods whispered to him.

“But I have not spoken of emptiness,” said Subhuti.

“You have not spoken of emptiness, we have not heard emptiness,” responded the gods. “This is true emptiness.” And blossoms showered upon Subhuti as rain.

(Paul Reps and Nyogen Senzaki, comps., Zen Flesh, Zen Bones [Boston: Tuttle Publishing, 1985], 53.)

Jack Lyon (editor@editorium.com) owns and operates the Editorium, which provides macros and information to help editors and publishers do mundane tasks quickly and efficiently. He is the author of Microsoft Word for Publishing Professionals, Wildcard Cookbook for Microsoft Word, and of Macro Cookbook for Microsoft Word. Both books will help you learn more about macros and how to use them.

November 18, 2015

Lyonizing Word: Why Computers?

by Jack Lyon

Dan A. Wilson, of The Editor’s Desktop, once advised editors that a computer is “far and away your most valuable tool, your ultimate enabler, your brain’s second-in-command. A brain with a pencil in its hand cannot compete — indeed, cannot even credibly challenge — a brain with a computer and computer-sophistication at its disposal.”

Why would that be so? After all, even under the guidance of the most brilliant programmer, a computer can’t ensure that a manuscript has accuracy, clarity, or elegance of expression. But a computer can fix hundreds of mechanical problems that editors shouldn’t have to worry about, and it can do it quickly and consistently.

If something can be automated, then automate it! Let the computer do the heavy lifting. Why is that important? Because it enables you to do more work in less time, and it frees your mind to concentrate on the things that a computer can’t handle (like accuracy, clarity, and elegance of expression). If you’re working for a corporation, that makes you more valuable as an employee (making raises more likely and layoffs less likely). If you’re working for yourself, it enables you to earn more money for the time you put in (as long as you’re charging by the job, the word, or the page, which you should be [see, e.g., On the Basics: Dealing with the Perennial Question of Setting Rates for Our Work]).

Editors working on a computer almost always use Microsoft Word. Love it or hate it (I do both), it is unquestionably the de facto word processor in the publishing world. So how can you use Word to automate whatever can be automated? Here are some suggestions:

  1. Learn to use the full power of Word’s find and replace feature, including wildcards. My Wildcard Cookbook for Microsoft Word will teach you everything you need to know. (No brag, just fact, as we used to say in grade school.)
  2. Learn to record and run macros to automate repetitive editing tasks. My Macro Cookbook for Microsoft Word is a good starting place.
  3. Use Microsoft Word add-ins (like the ones I create at The Editorium) that expand Word’s features to automate various editorial tasks. Let’s look at what some of those add-ins can do to ease your workload.

FileCleaner

We’ll start with one of my most popular add-ins, FileCleaner, which cleans up some of the most common problems in electronic manuscripts, including:

  • Multiple spaces in a row
  • Multiple returns in a row
  • Spaces around returns
  • Double hyphens that should be em dashes
  • Hyphens between numbers that should be en dashes

And much, much more. Here’s a screen shot of the options available:

FileCleaner Options

FileCleaner Options

Want to try it? All of those options are included as part of my Editor’s ToolKit Plus 2014 add-in, which I highly recommend that you download and try. The program offers a 45-day trial period so you can make sure it does what you need before deciding to buy. And if you need help using it, I’m always available by email.

I’d like to point out one special feature of FileCleaner that is frequently overlooked. See that option (under “Formatting”) to “standardize font formats (remove overrides)”? It removes all those odd, inconsistent uses of different fonts that authors like to use, but at the same time it leaves italic, bold, superscript, and styles intact. You won’t believe what a difference this can make in cleaning up a manuscript!

FileCleaner also offers to clean up the active document, all open documents, or all documents in a folder, which means you can run the program on a whole batch of files at once while you go back to reviewing manuscripts (or spending time with family and friends).

Document options

Document Options

Remember all of my talk about automating what can be automated? This is what I’m talking about. Instead of manually doing dozens of find-and-replace routines on dozens of documents, let FileCleaner do the work.

MegaReplacer

FileCleaner is great for cleaning up common problems, but what if you have uncommon problems that you need to clean up? What if you need to go through three dozen documents and change millenium to millennium in all of them, along with dozens of other misspellings (manger to manager, rarify to rarefy, and on and on and on)? That’s what MegaReplacer is for. Again, it works on the active document, all open documents, or all documents in a folder. But unlike FileCleaner, it allows you to define your own find-and-replace items and then run them en masse. You start by creating a list of the items you want to find and replace, with the find item on the left and the replace item on the right, separated by a pipe symbol (|), which you’ll probably find under your backspace key. Your list will look something like this:

millenium|millennium
manger|manager
pubic|public

Save the list as a Word document, and you can use it over and over again.

So far, so good. But you’re not limited to finding and replacing individual words; you can find and replace whole phrases that you’d ordinarily have to fix manually while editing:

at this point in time|now
alright|all right
an historical|a historical
a large number of|many
a small number of|some

To give you even more flexibility, MegaReplacer allows you to specify Match Case, Whole Words Only, both Match Case and Whole Words Only, or Use Wildcards by appending a code to the items on your list:

“+c” for Match Case
“+w” for Find Whole Words Only
“+&” for Match Case and Find Whole Words Only
“+m” for Use Wildcards

Here’s an example of each:

Department|department+c
per|according to+w
Chief|chief+&
p ([0-9]@.\))|p. \1+m

To get you started, MegaReplacer comes with a long list of useful corrections that you can modify to meet your needs.

Editor’s ToolKit

The most basic functions of Editor’s ToolKit Plus reside in the section called “Editor’s ToolKit”:

Editors ToolKit Menu

Editors ToolKit Menu

In particular, they automate some of the most common editorial tasks:

Text Features

Text Features

Furthermore, Editor’s ToolKit assigns these tasks to the function keys on your keyboard. Need to italicize (or romanize) a word? Press F8. Want to transpose two words? Press F11. To lowercase a word, press F10.

Please note that these keyboard assignments are the default setting for Editor’s ToolKit, which Rich Adin has correctly pointed out should not be the case (and will not be the case in the next version of the program). You can easily go back to Word’s original settings, however, by clicking the Editor’s ToolKit Plus icon and then clicking “Clear Keyboard Shortcuts.”

Keyboard Shortcuts

Keyboard Shortcuts

But if you find that you like the Editor’s ToolKit keyboard assignments, you can activate them by clicking “Set Keyboard Shortcuts.” The program download includes a keyboard template that lists the default shortcuts; print it out and place it above your function keys, and you’ll have a handy guide to which key does what (remember WordPerfect 5.1?).

The keyboard shortcuts for Editor’s ToolKit are not arbitrary, by the way. I’ve tried to arrange them so that the most common editorial tasks are right at your fingertips. For example, F7 toggles italic on and off. Yes, CTRL + I does the same thing, but after you’ve used F7 a few times, CTRL + I will seem clunky and annoying. Something that small does make a difference in how easily and smoothly you’re able to work in Word (see Lyonizing Word: The Right Tool for the Job and Lyonizing Word: Assigning Macro Shortcut Keys).

Many other features are available from the keyboard, but my favorite is Cap Title Case. To use it, select the text you want to put in title case and press F9. But doesn’t Microsoft Word already have that feature? Yes, it does. But take this example:

The call of the wild

Microsoft Word will turn it into this:

The Call Of The Wild

Editor’s ToolKit will turn it into this:

The Call of the Wild

In other words, Editor’s ToolKit properly handles common articles and prepositions. (The next version of the program will allow you to specify those you want to use.)

All of these are small things, but in the pressure-cooker of day-to-day editing, small things make a big difference in the ease and even the pleasure with which these tiny tasks can be accomplished. I’ve been a working editor since 1978, so I’ve been doing such tasks a long time. I created these tools (and the many others included with Editor’s ToolKit Plus) so that my computer can handle the boring, repetitive, mechanical tasks, allowing me to do the more enjoyable and important work that a computer, no matter how sophisticated, simply cannot do. That, right there, is the reason for computers.

How do you use your computer to make your work easier and faster? I’d love to hear your ideas.

Jack Lyon (editor@editorium.com) owns and operates the Editorium, which provides macros and information to help editors and publishers do mundane tasks quickly and efficiently. He is the author of Microsoft Word for Publishing Professionals, Wildcard Cookbook for Microsoft Word, and of Macro Cookbook for Microsoft Word. Both books will help you learn more about macros and how to use them.

Looking for a Deal?

You can buy Editor’s Toolkit Plus 2014 in a package with EditTools and PerfectIt and at a special savings of $78 off the price if bought individually. To purchase the package at the special deal price, click Editor’s Toolkit Ultimate.

October 19, 2015

Lyonizing Word: Secrets of the Ribbon

by Jack Lyon

From the beginning, Microsoft Word used a standard menu interface that looked like this:

Word's Original Menu Interface

Word’s Original Menu Interface

Click a menu item, and you’d get a list of more items:

Original Menu Interface Submenus

Original Menu Interface Submenus

Keep clicking, and eventually you’d activate the feature you wanted to use. All of this was straightforward. Then came Microsoft Word 2007, with its “Ribbon” interface:

The Ribbon Interface

The Ribbon Interface

According to Microsoft, the idea was to bring Word’s “most popular commands to the forefront” rather than burying them under a series of menus. For users, this took considerable getting used to, but, mostly, it worked. Unfortunately (and a little ironically), a few of the Ribbon’s features are still less than obvious, which prevents some users from understanding the full power of the features available to them.

Feature 1: Split Buttons

Most of the buttons on the Ribbon interface are just that—buttons. For example, here’s what the NoteStripper button looks like in my Microsoft Word add-in Editor’s ToolKit Plus 2014:

Notestripper Split Button

Notestripper Split Button

If you click that button, either on the pencil-sharpener icon or on the little arrow underneath it, here’s what you’ll get:

The Notestripper Menu

The Notestripper Menu

But now consider the button for FileCleaner, also included with Editor’s ToolKit Plus 2014. At first glance, it looks like the same kind of button used for NoteStripper, with a graphic icon at the top and a tiny arrow at the bottom:

The FileCleaner Button

The FileCleaner Button

Click the arrow, and here’s what you’ll get:

The FileCleaner Menu

The FileCleaner Menu

What many people don’t realize, however, is that the FileCleaner button is a split button. If you hover your cursor over a split button you’ll see a horizontal line splitting the button in two:

Seeing the Split

Seeing the Split

The bottom half, with the arrow, works just as before. But the top part is a different matter. If you click it, you’ll get full access to all of FileCleaner’s batch cleanup options:

FileCleaner Dialog

FileCleaner Dialog

Unfortunately, many people don’t realize that these options exist, which means that they’re missing much of the program’s power. This isn’t my fault, by the way; it’s a result of the way Microsoft designed the Ribbon (although possibly I should use two FileCleaner buttons, one for individual items and one for batch options). At any rate, now that you understand the problem, you can do a bit of exploring, looking for buttons that offer more than at first appears.

Feature 2: Dialog Box Launchers

At the bottom right of many of the groups on the Ribbon is a tiny box with an arrow:

The Tiny Arrow

The Tiny Arrow

Some users overlook these arrows completely, missing some of Word’s most useful features. Microsoft calls these arrows “Dialog Box Launchers,” and if you click one of them, you’ll see more options related to its particular group. Usually these options appear in a dialog box (hence the name) but sometimes in a task pane. For example, if you click the launcher in the “Paragraph” group, you’ll get the dialog box for paragraph formatting:

Launch of the Paragraph Dialog

Launch of the Paragraph Dialog

If you’re now saying “So that’s where that went,” I’m glad I could be of help. Again, it’s worth the effort to systematically explore all of the features that are hidden under these “launchers.”

Feature 3: Contextual Menus

Some of the items on the Ribbon are contextual — that is, they don’t appear until you’re actually working with something for which they’re needed. Tables provide a good example. If your document includes a table, and your cursor is actually in that table, you’ll see the following menu on the Ribbon:

Table Tools

Table Tools

Click it, and you’ll get this:

Table Contextual Menu

Table Contextual Menu

Wow, lots of options! But if you didn’t know about contextual menus, you might miss them. Other contextual menus appear if you’re working with any of the following:

  • Headers or footers
  • Text boxes
  • Graphics
  • Clip art
  • Equations
  • Shapes
  • SmartArt
  • WordArt

There are probably other items that use contextual menus, but those are the most obvious ones that come to mind. Remember, contextual menus show up only when they’re needed, so keep an eye out for them; you’ll be glad you did.

Now that you know some of the secrets of the Ribbon, would you say that Microsoft succeeded in using it to bring Word’s “most popular commands to the forefront”? Or does the Ribbon actually hide more features than it reveals? Perhaps more important, do you like the Ribbon, and if so, how do you use it to work more effectively? What do you think?

Jack Lyon (editor@editorium.com) owns and operates the Editorium, which provides macros and information to help editors and publishers do mundane tasks quickly and efficiently. He is the author of Microsoft Word for Publishing Professionals, Wildcard Cookbook for Microsoft Word, and of Macro Cookbook for Microsoft Word. Both books will help you learn more about macros and how to use them.

Looking for a Deal?

You can buy Editor’s Toolkit Plus 2014 in a package with EditTools and PerfectIt and at a special savings of $78 off the price if bought individually. To purchase the package at the special deal price, click Editor’s Toolkit Ultimate.

September 30, 2015

Lyonizing Word: But Wait—There’s More!

by Jack Lyon

Replacing Basic Text

Searching with wildcards in Microsoft Word can accomplish miracles in editing, but some people find wildcards a little too arcane to deal with. If you’re one of those people, you might benefit from some of Word’s lesser-known but easier-to-use search options. But first, let’s do a basic find and replace. Open Word’s “Find and Replace” dialog by pressing CTRL + H (or click Home > Editing > Replace on Word’s ribbon interface). Then:

  1. In the “Find what” box, enter a word you want to search for. (We’ll use the misspelled “millenium” as an example.)
  2. In the “Replace with” box, enter a word you want to replace the incorrectly spelled “millenium” with. (We’ll use the correctly spelled “millennium” as an example.)
  3. Click the “Replace All” button.
Find & Replace

Find & Replace

That’s it. Every occurrence of “millenium” will be replaced with “millennium.” Simple and quick.

Refining Your Search

But wait—there’s more! Microsoft Word provides many ways to refine your search. See the “More” button at the bottom of the “Replace” dialog?

More Button

More Button

Click it. Here’s what you’ll see:

The "More" Options

The “More” Options

Under “Search Options,” you can specify whether to search up, down, or through all your text:

Search Options

Search Options

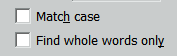
You can also match case and find whole words only:

Additional Options

Additional Options

There are actually lots of options, all worth exploring:

Match case

Obviously, this option finds only text that matches the case (capitalized or lowercased) of the text in the “Find what” box. If you enter “Hello” in the “Find what” box with “Match case” checked, Word finds “Hello” but not “hello.” If you enter “hello,” Word finds “hello” but not “Hello.”

Find whole words only

This option finds whole words only. For example, if you search for “sing,” Word finds “sing” but not “singing.” If this option is not checked, Word finds both “sing” and “singing,” as well as “using” and “kissing.”

Use wildcards

This option tells Word that you want to search using wildcards:

Use Wildcards

Use Wildcards

Wildcards are important, but in this article we’re trying to avoid these. For explanations and examples, see my past articles (e.g., Lyonizing Word: From Easy to Impossible — Three Variations on a Theme, Lyonizing Word: The Easy Way, Not So Easy, Lyonizing Word: The Easy Way, Not So Easy, and Lyonizing Word: We Can Do This the Easy Way, or . . . ; if you use EditTools, see The Business of Editing: Wildcarding for Dollars). Please note, however, that if this option is checked, you can no longer select “Match case” or “Find whole words only.” Even so, during a wildcard search, “Match case” is automatically enabled, even though it’s not shown as enabled (an oversight on Microsoft’s part). “Find whole words only,” on the other hand, is inactive.

Sounds like (English)

This option finds words that sound like the word in the “Find what” box. For example, if you search for “cot,” Word also finds “caught.” If you search for “horse,” Word also finds “hoarse.” This could be useful if you’re working on a document in which certain words have been confused or mistyped. Basically, this feature works on words that are homophones; it doesn’t seem to work on words that sound almost alike, such as “horse” and “whores.” On the other hand, while searching for “horse,” it also finds “horsey” but not “horses,” so who knows?

Find all word forms (English)

This option finds what Microsoft calls “all” forms of the word in the “Find what” box. For example, if you search for “sit,” Word also finds “sat” and “sitting.” The word “all” is a little misleading, however. The feature relies on an underlying database of word forms that is pretty good but has some omissions. For example, if you search for “eat,” Word finds “eat, “ate,” “eaten,” and “eating” but not “eater.” Similarly, if you search for “horse,” Word finds “horse,” “horses,” and “horsing” but not “horseless.” It’s a useful feature, mostly for finding verb forms; just don’t expect it to actually find all forms of a word.

Match prefix

This option matches words beginning with the search string. For example, if you put “pre” in the “Find what” box, Word finds “prepare,” “present,” and so on. This isn’t a “smart” feature; it searches for characters only, not word roots. For example, searching for “pre” also finds “prestidigitation” and “pressure,” even though “pre” isn’t really a prefix in those words.

Match suffix

This option matches words ending with the search string. For example, if you put “ing” in the “Find what” box, Word finds “singing,” “typing,” and so on. This isn’t a “smart” feature; it searches for characters only, not word roots. For example, searching for “ing” also finds “boing,” “spring,” and “thing,” even though “ing” isn’t really a suffix in those words.

Ignore punctuation characters

Ignores punctuation characters between words. For example, “trees plants and flowers” finds “trees, plants, and flowers” as well as “trees plants and flowers.” This might be useful for fixing problems with serial commas.

Ignore white-space characters

Ignores all white space (spaces, tabs, and so on) between words. For example, “webpage” finds “web page” as well as “webpage.” This is the inverse of “Find whole words only” and could be useful for fixing words that are sometimes spelled open and sometimes closed.

Other options

If you’re working in a language other than English, other options may be available, including Match Kashida, Match Diacritics, Match Alef Hamza, and Match Control. I know almost nothing about these options, so I can’t comment on them with any degree of expertise.

Format

One of the most important tools in Microsoft Word’s find and replace toolbox is the ability to search for formatting — all kinds of formatting. To do so, click the “Format” button:

Format Button

Format Button

Here’s what you’ll get:

The "Format" Options

The “Format” Options

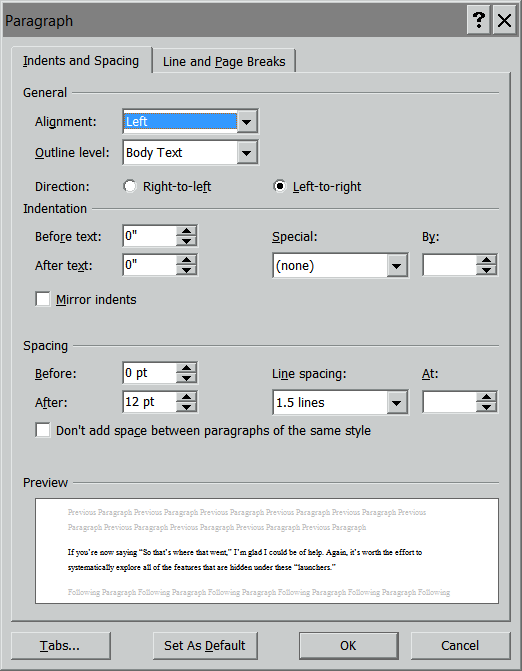
Each option (such as “Font”) opens the usual dialog for that feature:

Font Format Options

Font Format Options

I won’t go into all of the options in these dialogs as they’re basically the same ones you’d get while formatting any text in Word. “Font” displays font options, “Styles” displays styles, and so on. You can select any of those options and use them as something to find or replace. For example, if your cursor is in the “Find what” box and you select “Italic” in the “Find Font” dialog, here’s what you’ll get:

Displaying the Font Option Choice

Displaying the Font Option Choice

Now Word will find text in italics but not in roman. If you also enter a word, you’ll find that word in italic but not in roman. If you don’t enter a word, you’ll find anything formatted as italic.

But what about the “Replace with” box? What happens if you use formatting there?

If the “Replace with” box includes some text, whatever is found will be replaced by that text in the format you specified. If the “Replace with” box doesn’t include text, whatever is found will be replaced with itself in the format you specified. For example, if you search for the word “apples” to be replaced by “pears” in bold, that’s exactly what you’ll get — “pears” in bold. If you search for the word “apples” to be replaced by bold alone (with no text), you’ll get “apples” in bold.

If, on the other hand, you search for “apples” but don’t specify text or formatting in the “Replace with” box, “apples” will be replaced with nothing; in other words, it will be deleted.

Many variations are possible. Here’s a basic summary:

Find Replace Result
apples pears pears
apples pears [bold] pears [bold]
apples [bold] apples [bold]
apples [nothing] [apples deleted]
[bold] [nothing] [bold text deleted]
[bold] pears [bold text becomes “pears” in bold]
[bold] pears [italic] [bold text becomes “pears” in bold italic]
[bold] [italic] [bold text becomes bold italic]

Note that you can also specify not a certain kind of formatting, such as “not bold” or “not italic” in either find or replace. You can also use combinations of formatting (and “not” formatting). For example, you can search for bold but replace with italic and not bold, which will turn any bold text into italic (but not bold italic) text.

Built-In Codes

In addition to all of those options, Microsoft Word includes lots of built-in find-and-replace codes that are not wildcards (although lots of people call them that). You can use these built-in codes to search for things like paragraph breaks, tabs, section breaks, column breaks, dashes, footnotes, endnotes, graphics, and many other things that aren’t actual text, and codes are a whole lot easier to use than wildcards. In fact, codes should be your default tool; you should use wildcards only when built-in codes won’t do what you need (which is actually fairly often, unfortunately).

Some of Word’s built-in codes can be used only in the “Find what” box; others can be used only in the “Replace with” box. Some of the codes can be used in both boxes.

“Find What” Codes

To see the codes that can be used in the “Find what” box, put your cursor in the box. Now click the “Special” button at the bottom of the “Find and Replace” dialog.

The "Special" Button

The “Special” Button

You’ll get a list like this:

The "Special" Options

The “Special” Options

Identify the item you want to find and click it, for example, “Paragraph Mark.” You’ll get the following code in the “Find what” box (since that’s where your cursor was located):

^p

That tells Word to find a paragraph break — that is, the end of a paragraph.

Each item on the list will insert a different code. For example, here’s the code for an em dash:

^+

And here’s the code for an en dash:

^=

“Replace With” Codes

Now put your cursor in the “Replace with” box and click the “Special” button again. This time, you’ll get a different list:

The Codes

The “Replace with” List

Again, clicking one of the list items will insert a code into the “Replace with” box. For example, if you click “Clipboard Contents” you’ll get this:

^c

That’s an extremely useful code, because ordinarily the “Replace with” box can hold no more than 255 characters. But using the ^c code, you can replace with anything that is currently copied to the Clipboard, which can hold many pages of text, graphics, or anything else.

After you’ve worked with built-in codes for a while, you’ll find it easy to just type them in by hand. In the meantime, you can use the “Special” lists to insert them.

You can also use combinations of codes. For example, you could search for tabs followed by paragraph breaks (^t^p) and replace them with paragraph breaks alone (^p).

Here’s a summary of Word’s built-in codes and where they can be used:

Character or object Find what Replace with
Annotation Mark (comment) ^a
Any character ^?
Any digit ^#
Any letter ^$
Caret character ^^ ^^
Clipboard contents ^c
Column break ^n ^n
“Find what text” (whatever was found during your search) ^&
Em dash ^+ ^+
En dash ^= ^=
Endnote mark ^e
Field ^d
Footnote mark ^f
Graphic ^g
Line break ^l ^l
Manual page break ^m ^m
Nonbreaking hyphen ^~ ^~
Nonbreaking space ^s ^s
Optional hyphen ^- ^-
Paragraph mark ^p ^p
Section break ^b
Tab character ^t ^t
White space ^w

Even without wildcards, Microsoft Word’s find and replace features can do an awful lot — much more than you might think. You probably already knew how to use “Match case” and “Find whole words only,” but did you know about those other options? “Ignore punctuation characters” and “Ignore white-space characters,” for example, can be very useful in editing. Being able to find and replace formatting is essential, especially when using styles. And using Word’s built-in codes lets you search for all kinds of things (graphics, page breaks, dashes, and so on) that would otherwise require more advanced techniques (like wildcards and numeric codes). In other words, Microsoft Word’s basic find and replace features aren’t so basic — at least not in what they can do!

Wildcard Cookbook

This article is a slightly modified excerpt from my new book, Wildcard Cookbook for Microsoft Word, now available at Barnes & Noble, Amazon, and other fine bookstores:

"Wildcard Cookbook" by Jack Lyon

“Wildcard Cookbook” by Jack Lyon

Jack Lyon (editor@editorium.com) owns and operates the Editorium, which provides macros and information to help editors and publishers do mundane tasks quickly and efficiently. He is the author of Microsoft Word for Publishing Professionals and of Macro Cookbook for Microsoft Word. Both books will help you learn more about macros and how to use them.


August 31, 2015

Lyonizing Word: Assigning Macro Shortcut Keys

by Jack Lyon

I recently had the pleasure of doing an interview for the Chicago Manual of Style “Shop Talk” column. In the interview, I explained how to record a simple macro for transposing characters while editing.

After reading the interview, editor Kristi Hein commented:

Terrific. Next, please discuss the process of choosing a keystroke combination for your macro: not using one of the many you’ve already assigned, making it a combo that’s not too convoluted for the hands (defeating the purpose somewhat), and that you will remember among all the other keystroke combinations you’ve assigned. Therein lies the true art of automating Word effectively and efficiently.

Kristi is right, but wow, that’s a tall order. Let’s look at each requirement separately.

Not using one of the many we’ve already assigned

To not use one of the many keyboard combinations already assigned, we need to know the keystroke combinations we’ve already assigned. Here’s how to do that:

  1. Click CTRL + P to open Word’s “Print” dialog.
  2. Under “Settings,” click the dropdown list that begins with “Print All Pages.”
  3. Under “Document Properties,” click “Key Assignments.” (Also, notice the other things you might want to print, such as styles and AutoText entries.)
  4. Click the “Print” button.

You’ll get a nicely formatted document that shows all of your existing key combinations. The entries will look something like this, with the key combinations on the left and the macro names on the right:

Alt+Ctrl+Shift+S — Normal.NewMacros.ChangeStyleBasedOn
Alt+Ctrl+Shift+I — Normal.NewMacros.CheckIndexCodes
Alt+Ctrl+Shift+C — Normal.NewMacros.FixCodes
Alt+Ctrl+Shift+M — Normal.NewMacros.ParseMetadata

“And how do I assign key combinations to begin with?” you’re wondering. There are (at least) a couple of ways:

When you go to record a new macro (under View > Macro), one of your options is to assign a key combination by pressing the “Keyboard” button:

Using the keyboard option

Using the keyboard option

When you do that, you’ll see the following dialog:

The dialog for entering the key combination

The dialog for entering the key combination

If you were working with an existing macro (editing rather than recording), you’d see any existing key combinations under “Current keys.” To assign a new combination, put your cursor in the box labeled “Press new shortcut key” and, well, press a new shortcut key.

If the new key is already assigned to a macro, you’ll get a “Currently assigned to” message like this:

Currently assigned message

Currently assigned message

That’s handy because it helps you avoid accidentally overwriting a combination that you’ve already assigned (although you can overwrite one on purpose). If you don’t get that message, you’re good to go, and you can click the “Assign” button (on the lower left) and then the “Close” button (on the lower right) and then record the keystrokes that will make up your macro. (When you’re finished recording, click View > Macro > Stop Recording.)

If you want to assign a key combination to an existing macro, things get a little more complicated:

  1. Click “File > Options.”
  2. Click the “Customize Ribbon” button (on the left).
  3. Under “Choose commands from,” select “Macros” (unless you want to use one of Word’s built-in commands, which you can also do).
  4. At the bottom of the dialog, you’ll see “Keyboard shortcuts: Customize.” Click the “Customize” button and proceed as explained above.
Customizing

Customizing

But to continue…

Making it a combo that’s not too convoluted for the hands

This, of course, depends on how many fingers you have (I have ten so far) and how large or small they are, along with your native dexterity. As you can see in the picture above, I’m partial to ALT + CTRL + SHIFT, which I actually find easy to press with my left hand while pressing a letter key with my right. If that’s too convoluted for you, you might try CTRL + SHIFT or CTRL + ALT, both of which are easy to do. ALT + SHIFT is a little more difficult. You can even use plain old CTRL or ALT with another character, but that starts to encroach on Word’s built-in key combinations (like CTRL + S to save a document).

There’s another system, however, that you may not know about:

  1. Press your desired key combination.
  2. Press another key.

The result will be something like this:

Two-step key

Two-step key

See that ,”1” after the “Alt+Ctrl+Shift+M”? That means I’ve just created a two-step key combination. To run the macro, I press ALT+CTRL+SHIFT+M. Then I press 1 (the one key, all by itself). At that point (and not before), the macro will run. Pretty slick!

What that means is that you can assign all kinds of two-step combinations (letters will work as well as numbers), which gives you two characters for the mnemonic you use to remember what a combination does. That’s twice as good as one! (Unfortunately, Word won’t let you use more than two.) It also means you can create shortcuts like these:

ALT+CTRL+SHIFT+H,1 (to apply the Heading 1 style)ALT+CTRL+SHIFT+H,2 (to apply the Heading 2 style)

Or these:

CTRL + SHIFT + T,C (to transpose characters)
CTRL + SHIFT + T,W (to transpose words)
CTRL + SHIFT + T,S (to transpose sentences)
CTRL + SHIFT + T,P (to transpose paragraphs)

And so on. The mind reels at the possibilities!

Making it a combo that you will remember among all the other keystroke combinations you’ve assigned

Using two-step combinations should help with that requirement as well, but for serious keyboard junkies there’s another solution — XKeys. The company manufactures various models, from 24 keys on up to 128 keys! You can assign the keys to your macros, label the keys, color code them, and so on. The 60-key model looks like this:

The 60-key XKeys

The 60-key XKeys

Rich Adin swears by this gadget, and he’s one of the most productive copyeditors I know. Maybe you’d find it useful too.

We’ve met the requirements

In summary, we’ve figured out some ways to meet all of Kristi Hein’s requirements for key combinations:

  • Not using one of the many you’ve already assigned.
  • Making it a combo that’s not too convoluted for the hands.
  • Making it a combo that you will remember among all the other keystroke combinations you’ve assigned.

These may seem like small things, but small things add up to greater editing efficiency, and that means more money in your pocket and less time at work, both of which are big things. I hope this essay will help you achieve them.

Jack Lyon (editor@editorium.com) owns and operates the Editorium, which provides macros and information to help editors and publishers do mundane tasks quickly and efficiently. He is the author of Microsoft Word for Publishing Professionals and of Macro Cookbook for Microsoft Word. Both books will help you learn more about macros and how to use them.

July 20, 2015

Lyonizing Word: From Easy to Impossible — Three Variations on a Theme

by Jack Lyon

Rich Adin just keeps on escalating the difficulty of his requests. That’s okay, because I appreciate a good challenge. Here’s his latest:

Okay, Jack, you solved the problem of reducing the number of authors from more than three down to three.

To see what Rich is talking about, please see my previous posts here: Lyonizing Word: We Can Do This the Easy Way, or . . . and Lyonizing Word: The Easy Way, Not So Easy.

Rich continues:

But there is a caveat: the list of names needs to end with “et al:”. So let me pose three more variations.

Three?! Oh, all right. Here we go:

Variation 1

How do I handle instances where the ending is punctuation other than “et al:”? For example, it could be a different punctuation mark than the colon or it could end with an author name and not “et al” (e.g., “Lyon J, Adin R, Carter TO, Jackson TT, Doe J, Smith K, Winger W:” or “Lyon J, Adin R, Carter TO, Jackson TT, Doe J, Smith K, Winger W, Hoffnagle TTP.”)

How do we handle instances where the ending is punctuation other than “et al:”? Here are Rich’s examples, all laid out for our inspection:

Lyon J, Adin R, Carter TO, Jackson TT, Doe J, Smith K, Winger W:

Lyon J, Adin R, Carter TO, Jackson TT, Doe J, Smith K, Winger W, Hoffnagle TTP.

As usual, the key is to find the “handle,” the unique elements we can grab to carry out our search. (For more on this, please see my article “What’s Your Handle?” [2003] at the Editorium Update.)

In Rich’s examples, the “handles” would have to be the colon that ends the first entry and the period that ends the second. Let’s try modifying the wildcard string from the previous post for Lyonizing Word:

([!^013]@, [!^013]@, [!^013]@, )[!^013]@([:.])

Here’s what that means:

Find any characters except a carriage return: [!^013]
repeated any number of times: @
followed by a comma
followed by a space
repeated three times
and enclosed in parentheses to form a “group.”
Then find any character except a carriage return: [!^013]
repeated any number of times: @
followed by [:.] (specifying a colon or a period) in parentheses to form a group.

And we can use the following in the “Replace With” box:

\1\2

Here’s what that means:

Replace everything that was found
with the text represented by group 1: \1
followed by the text represented by group 2: \2

But does that actually work? Well, sort of, Here’s what we get:

Lyon J, Adin R, Carter TO, :
Lyon J, Adin R, Carter TO, .

Maybe that’s close enough, as it would now be an easy matter to search for comma space colon and replace it with a colon, and to search for comma space period and replace it with a period. But if we want to refine our search string even further, we could use this:

([!^013]@, [!^013]@, [!^013]@), [!^013]@([:.])

Here, we’ve placed the comma and space following the third name outside the parenthetical group, so they’re not included when the group is replaced by /1. That actually solves the problem, if you want to get precise, giving us a result like this:

Lyon J, Adin R, Carter TO:
Lyon J, Adin R, Carter TO.

Variation 2

Rich wrote:

How can I revise the string to work even if there is no consistency in punctuation of names? For example, suppose the names are: “Lyon, J, Adin R, Carter T.O., Jackson TT, Doe, J.; Smith K; Winger, W; Hoffnagle TTP.”

As given, this can’t be done. Why? Because we’ve lost the uniqueness of the comma “handles” that separate the names. For example, instead of this —

Lyon J,

— we have this:

Lyon, J,

And instead of this —

Smith K,

— we have this:

Smith K;

So again, as given, we can’t fulfill Rich’s request. But can we change the “as given”? Why, yes, we can!

We can search for a lowercase letter followed by a comma (at the end of a last name) and replace it with just the lowercase letter (and no comma):

Find what: ([a-z]),
Replace with: \1

We can search for a semicolon (which sometimes follows initials) and replace it with a comma:

Find what: ;
Replace with: ,

Then we can use the same wildcard string we used earlier to fulfill Rich’s request:

Find what: ([!^013]@, [!^013]@, [!^013]@), [!^013]@([:.])
Replace with: \1\2

You may be wondering if these wildcard strings will affect the article titles and journal names and not just the author names. The answer is, it depends. I’m assuming, for example, that the article titles and journal names don’t include commas (just for purposes of illustration). But if they do, you may have to get creative. Let’s take this as an example:

Levy, D, Ehret G, Rice K, Verwoert G, Launer L, Dehghan A, Glazer N, Morrison A, Johnson A, Aspelund T, Ganesh S, Chasman D: Genome-wide association study of blood pressure, stress, and hypertension. Nature 2009, 41(6): 677-687.

See that comma after “Levy”? Above, we got rid of it with the following strings:

Find what: ([a-z]),
Replace with: \1

But notice that this will also remove the commas after “pressure” and “stress” in the article title, which we don’t want to do. The solution, again, comes down to handles. What do we have that sets off the article title and journal name? In this example, they’re preceded by the colon after the author names (“Chasman D:”) and followed by a carriage return (at the end of the citation). So here’s a rather sneaky solution: Search for a colon followed by anything that isn’t a carriage return until you come to a carriage return. Then replace whatever was found with itself (^&) formatted as Hidden:

Find what: :[!^013]@^013
Replace with (use Hidden formatting): ^&

If you don’t know how to replace using formatting, here’s the secret:

1. Put your cursor in the “Replace with” box.
2. Click the “More” button if it’s showing.
3. Click the “Format” button on the bottom left.
4. Click “Font.”
5. Put a check in box labeled “Hidden.”
6. Click the “OK” button.

Notice that you can replace with all kinds of formatting: styles, paragraph alignment, and so on. You can also use formatting in the “Find what” box! This is really powerful stuff, and if you didn’t know about it before, now you can add it to your bag of tricks.

At any rate, with the article titles and journal names formatted as Hidden, you can make sure they actually are hidden by clicking the “Show/Hide” button (with the pilcrow icon: ¶) on Word’s “Home” tab. Then run your find and replace to remove commas from last names:

Find what: ([a-z]),
Replace with: \1

Finally, unhide the article titles and journal names (after using “Show/Hide” to display them):

Find what: (Hidden formatting)
Replace with: (Not Hidden formatting)

At that point, the commas will be gone from the authors’ last names but preserved in the article titles and journal names.

By the way, if you’re working on a Macintosh, you’ll find that Word doesn’t recognize the standard code for a carriage return (^013) while searching with wildcards. But never fear: you can still do what you need by “escaping” the code with a backslash and treating it as a range using square brackets. In other words, use this:

[\ˆ013]

To specify not a carriage return, use the following:

[!\ˆ013]

Variation 3

Rich wrote:

How can I adapt the wildcard string to delete those in excess of a certain number? For example, I have one client who wants up to ten author names listed and “et al” used only for names eleven and following. I would like to specify how many names I want retained and replace the excess with “et al.” For example, if there are fifteen names, delete the last five if ten are okay and replace them with “et al.”

Theoretically, we could do that as long as there’s a “handle” that marks the end of the names. Let’s take this example:

Levy D, Ehret G, Rice K, Verwoert G, Launer L, Dehghan A, Glazer N, Morrison A, Johnson A, Aspelund T, Ganesh S, Chasman D: Genome-wide association study of blood pressure and hypertension. Nature 2009, 41(6): 677-687.

There are actually twelve names there, so we want to keep the first ten and replace the last two with “et al.” What’s our handle? The colon after the last name (“Chasman D:”) and before the article’s title. So let’s try an expansion of the wildcard search string we used in the previous post for Lyonizing Word. Instead of grouping three comma-separated names, we’ll group ten:

Find what: ([!^013]@, [!^013]@, [!^013]@, [!^013]@, [!^013]@, [!^013]@, [!^013]@, [!^013]@, [!^013]@, [!^013]@,)[!^013]@(:)
Replace with: \1 et al.\2

That would work if Word could handle it. But if you try it, Word will complain: “The Find What text contains a Pattern Match expression which is too complex.” So now what? Honestly, I’m not sure. I tried several other possibilities, none of which were successful. So if you, Gentle Reader, have any ideas about how to accomplish this seemingly impossible feat, I’d love to hear them.

Wildcard searching can’t do everything, but it can do an awful lot. As I’ve said before, after all these years of editing, wildcard searching is the tool I rely on the most. I encourage you to invest the time needed to learn to use this tool, which will repay your efforts many times over. A good place to start is my free paper “Advanced Find and Replace in Microsoft Word.”

I hope you’ll also watch for my forthcoming Wildcard Cookbook for Microsoft Word. I’m still trying to find more real-life examples for the book, so if you have some particularly sticky problems that might be solved using a wildcard search, I hope you’ll send them my way. Maybe I can save you some work and at the same time figure out solutions that will help others in the future. Thanks for your help!

Jack Lyon (editor@editorium.com) owns and operates the Editorium, which provides macros and information to help editors and publishers do mundane tasks quickly and efficiently. He is the author of Microsoft Word for Publishing Professionals and of Macro Cookbook for Microsoft Word. Both books will help you learn more about macros and how to use them.

For other Lyonizing Word essays at An American Editor, Lyonizing Word at AAE.

June 29, 2015

Lyonizing Word: The Easy Way, Not So Easy

by Jack Lyon

After publishing my last article, Lyonizing Word: We Can Do This the Easy Way, or . . ., Rich Adin, An American Editor, wrote:

As written, your wildcard find and replace reduces four names to three if “et al:” is the ending characteristic. How do you write it so that it can handle any number of names, say up to seven?

Good question, and a nice challenge for a wildcard search. Let’s say we have citations with strings of names like this:

Lyon J, Adin R, Carter TO, Jackson TT, Doe J, Smith K, Winger W, et al: blah blah blah

That’s seven names, but let’s see if we can make a wildcard string that will find any number of names and cut them down to three. My first impression is that this might be difficult or even impossible. But let’s try the following wildcard string:

([!^013]@, ){3}([!^013]@, ){1,}(et al:)

Here’s what that means:

Find any character except a carriage return: [!^013]
repeated any number of times: @
followed by a comma
followed by a space
and enclosed in parentheses to form a “group.”
Do that three times in a row: {3}
Find using the same group: ([!^013]@, )
if it occurs once or more (as indicated by the comma): {1,}
followed by “et al:” in parentheses to form a group.

There’s just one problem: It doesn’t work. And that’s how it often is with wildcards — sometimes you have to fiddle around to get the result you want; trial and error are key. So let’s see if we can find just three instances of text using our group:

([!^013]@, ){3}

That doesn’t work either. What in the world is going on here? Let’s try using the group three times in a row:

([!^013]@, )([!^013]@, )([!^013]@, )

That does work. So why not this?

([!^013]@, ){3}

Could it be that {3} doesn’t apply to the wildcard pattern ([!^013]@, ) itself but to the first instance of text that pattern finds? In other words, would that wildcard string  find the first three names in a citation like the following?

Lyon J, Lyon J, Lyon J, Lyon J, Lyon J, Lyon J, Lyon J, et al: blah blah blah

Sure enough, that works! So we’ve just learned something new about wildcard searches. For clarity, I’ll restate it here:

Specifying how many times to find something (using {3}, for example) doesn’t apply to the wildcard pattern it follows but to the first instance of text that pattern finds.

Unfortunately, that means we need to work out a different approach to our original problem. How about this?

([!^013]@, [!^013]@, [!^013]@, )([!^013]@, ){1,}(et al:)

Here’s what that means:

Find any character except a carriage return: [!^013]
repeated any number of times: @
followed by a comma
followed by a space
repeated three times
and enclosed in parentheses to form a “group.”
Find using the same group: ([!^013]@, )
if it occurs once or more (as indicated by the comma): {1,}
followed by “et al:” in parentheses to form a group.

But no, that doesn’t work either! Why not? Oh, yeah, because of that {1,}. As we discovered earlier:

Specifying how many times to find something (using {3}, for example) doesn’t apply to the wildcard pattern it follows but to the first instance of text that pattern finds.

Well, okay, then. We’ll stop using numbers (such as {1,}) to specify how many times a pattern should be repeated (at least for our current purposes). Let’s try this instead:

([!^013]@, [!^013]@, [!^013]@, )[!^013]@(et al:)

Here’s what that means:

Find any characters except a carriage return: [!^013]
repeated any number of times: @
followed by a comma
followed by a space
repeated three times
and enclosed in parentheses to form a “group.”
Then find any character except a carriage return: [!^013]
repeated any number of times: @
followed by “et al:” in parentheses to form a group.

Well, son of a gun; that actually works. So now we can use the following in the “Replace With” box:

\1\2

Here’s what that means:

Replace everything that was found
with the text represented by group 1: \1
followed by the text represented by group 2: \2

Group 1, you’ll remember, was this:

([!^013]@, [!^013]@, [!^013]@, )

It finds the first three names in our citations. And group 2 was this:

(et al:)

It finds the end of our citations.

And so, finally, we’ve succeeded in fulfilling Rich’s original request:

As written, your wildcard find and replace reduces four names to three if “et al:” is the ending characteristic. How do you write it so that it can handle any number of names, say up to seven?

Sometimes the easy way isn’t so easy. Nevertheless, it’s almost always worth pursuing. In Rich’s case, it reduced his editing time from hours (removing extraneous names by hand) to minutes (removing the names with a wildcard find and replace). It also gave Rich a wildcard search that he can save in his fabulous EditTools software for use with future projects. And it provided a deeper and clearer understanding of how to use wildcard searches.

After all these years of editing, wildcard searching is the tool I rely on the most. I encourage you to invest the time needed to learn to use this tool, which will repay your efforts many times over. A good place to start is my free paper “Advanced Find and Replace in Microsoft Word.”

I hope you’ll also watch for my forthcoming Wildcard Cookbook for Microsoft Word. I’m still trying to find more real-life examples for the book, so if you have some particularly sticky problems that might be solved using a wildcard search, I hope you’ll send them my way. Maybe I can save you some work and at the same time figure out solutions that will help others in the future. Thanks for your help!

Jack Lyon (editor@editorium.com) owns and operates the Editorium, which provides macros and information to help editors and publishers do mundane tasks quickly and efficiently. He is the author of Microsoft Word for Publishing Professionals and of Macro Cookbook for Microsoft Word. Both books will help you learn more about macros and how to use them.


Looking for a Deal?

You can buy EditTools in a package with PerfectIt and Editor’s Toolkit at a special savings of $78 off the price if bought individually. To purchase the package at the special deal price, click Editor’s Toolkit Ultimate.

« Previous PageNext Page »

Create a free website or blog at WordPress.com.