In the paper beginning…
When I began my career, most editing was done on paper; online editing was just starting to peek out of its birth canal. One of the disadvantages to paper-based editing is that it requires excellent memory — especially on long projects — and on lots of colored paper. Each of my publisher clients had different requirements for marking queries.
One wanted author queries on yellow flags, editor queries on pink (or red) flags, compositor queries on gray flags, permission queries on green flags, and illustrator queries on blue flags. Other clients used the same colors but changed who they were for (e.g., editor queries on green flags). It was a great system for enabling quick, visual overview and for someone in the production chain to identify those items directed to her. But some manuscripts were buried in flags and there still was needed one more flag for reminders to me. (It was this flag system that led to the color highlighting system now used in EditTools.)
I often had to note where something was in the manuscript so that I could easily come back to it once I found an answer. For example, the each time I came across “central nervous system,” which I knew was commonly referred to by its initials (“CNS”), I needed to flag it so I could determine how many times the phrase appeared in the chapter because the client wanted it changed to “central nervous system (CNS)” at first chapter appearance and subsequent appearances changed to “CNS” — but only if the term was used more than three times in the manuscript. Paper-based editing didn’t offer an easy way to do a search for “central nervous system” or for “CNS.”
The transition to online editing made that particular task easier (although still time-consuming and still not so easily done without using EditTools’ Enhanced Search, Count, and Replace [ESCR] macro), but didn’t really solve the bookmarking problem.
Then came electronic bookmarks…
It is true that Microsoft Word’s native Bookmark feature (Insert > Bookmark) was an improvement but it has some major limitations that make it less useful than it could be.

Bookmarks in Word
Bookmarks can be very useful; they let you move easily from place to place in a document and they can help you track things to ensure that some things are not missed. But the value of bookmarking is limited by the bookmark style that is permitted — which is where Word’s bookmarking is weak and unhelpful.
Using the CNS example from above, let’s take a look at Word’s Bookmark feature. There are several important limitations to bookmarking that make it less useful than it could be. As these next images show, you cannot make a bookmark easily readable.
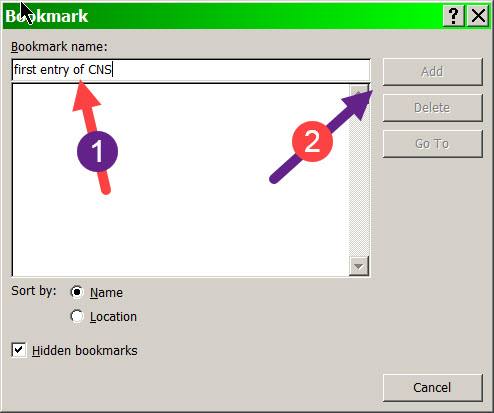
Creating a bookmark in Word (1)
Creating a bookmark in Word (2)
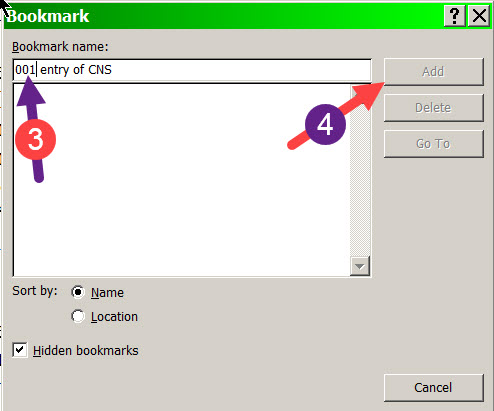
There are two ways to help readability. The first is to have words separated by spaces and the second is to combine numbers with words so that you can ascertain at a glance the information you seek. In the first image above, I wanted to add a readable phrase as a bookmark (#1) but Word doesn’t like that so it doesn’t make the Add button accessible (#2). In the second image, I wanted to replace “first” with “001” (#3) because that would let me order the bookmarks as well as give a readily seen count of the instances. But, again, Word doesn’t like that option (#4).
What Word wants is a single entry (#5). When I remove the spaces in the phrase so the words run together (#5), Word tells me that is a good bookmark and gives me access to Add (#6). (Trivia note 1: Word does not let you keep the Bookmark dialog open. Each time you want to add a bookmark, go to a bookmarked place, or delete a bookmark, you need to reopen the Bookmark dialog.)

A proper Word bookmark
As #7 shows, Word is happy to accept as many similar mashed-together phrases as I want to use as bookmarks. But note that the bookmarks are not easy to read and imagine locating one particular bookmark in a document with a significant number of bookmarks — especially if you cannot remember the exact wording of the bookmark. (Trivia note 2: Word limits bookmarks to a maximum of 40 characters.)

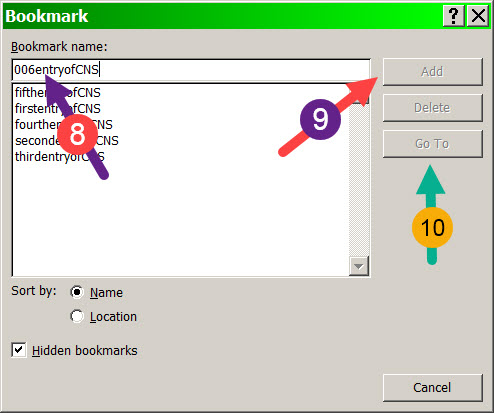
Bookmarks in Word
If you try to combine numbers with letters, Word doesn’t permit it (#8) and shows its displeasure by not making the Add accessible (#9).
Mixing numbers and letters in Word bookmarks
In addition, Word’s Bookmark feature offers only three options: Add, Delete, and GoTo (#10). You Delete each bookmark individually; there is no option for deleting multiple bookmarks concurrently. And the only way to rename a bookmark is to delete it and create a new one.
What this means is that bookmarking in Word is like unripe fruit — tempting but not yet ready for use.
The answer is to use EditTools’ Bookmarks and make use of bookmarking’s potential.
Letting the sunshine in…
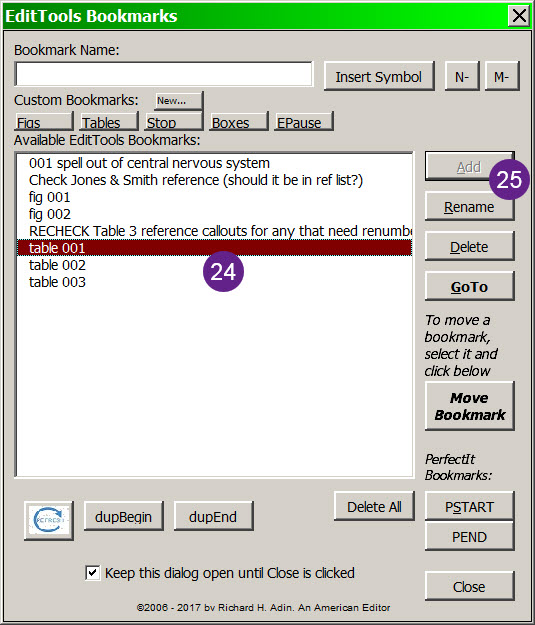
When you open EditTools’ Bookmarks (#11), the dialog displays all of the existing bookmarks in the document (#12). In addition, you can choose to keep the dialog open (#13). I find this particularly handy as I like to be able to quickly add bookmarks, move them, and travel amongst them.

The EditTools Bookmarks interface
The bookmarks I created above are not very useful to me, so I can select all (or some) of them (#13) and click delete (#14) to remove all of them simultaneously.

Selecting multiple bookmarks and deleting them altogether
That leaves me with a bookmark-free document (#15) that is just waiting for me to add bookmarks (#16). Not only can I mix numbers with letters, I can also use spaces (and even insert a symbol from Word’s Symbol dialog) so that the bookmark is intelligible. Note that Add (#17) is accessible.

Creating a bookmark in EditTools
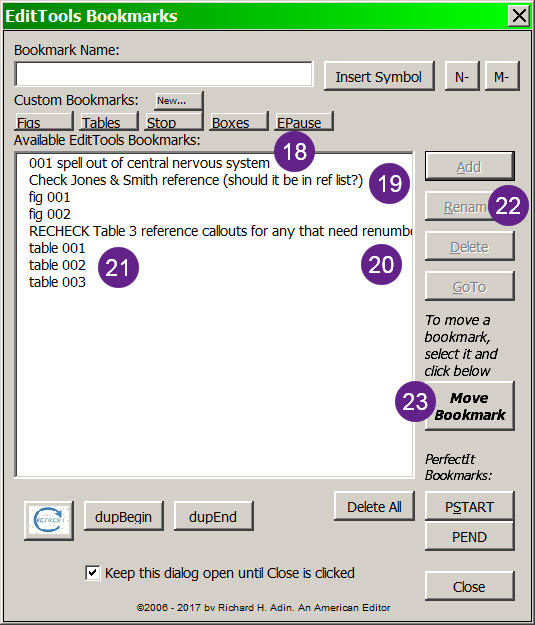
The next image shows some of the power of bookmarking and the power of using EditTools’ Bookmarks macro. The “central nervous system” bookmark (#18) was readily accepted. But it is the other bookmarks that really show how useful bookmarking can be. There are two reminders of things I need to do before completing editing of the document. The first is to check a particular reference (#19) and the second is to recheck a table (#20). There are other ways of making these kinds of reminder notes, but with this method, I not only get the reminder not but the note also acts as a location bookmark. When I am ready to recheck the table, I can select that bookmark and click GoTo to go to the table.
Making bookmarks work for you
Trivia note 2 earlier indicated that Word bookmarks had a 40-character limit; EditTools’ bookmarks does not, as #20 shows. Although it is rare to need more characters, there are occasions, I have found, when it is useful. With EditTools’ Bookmarks, I can use bookmarks as more than just location points — bookmarks are now extremely useful during editing.
That I can keep the dialog open (#13) makes the Bookmarks macro useful for navigating the document and tracking elements. For example, depending on whether I have to style (e.g., apply a template and style headings and text) then edit the document or just edit it, I have two methods for tracking that each table and figure is called out and exists. If I have to style, as I come to a table of figure callout in the text, I insert a bookmark (#21). Because tables and figure legends appear at the end of the documents I usually edit, when I get to them I move the bookmark from the callout to the legend or table by (a) inserting the mouse cursor where I want the bookmark placed, (b) selecting the bookmark I want moved, and (c) pressing Move Bookmark (#23). That will move the bookmark from the text callout to the legend or table. If I don’t have to style, I just insert the bookmark in the figure legend or table before I begin editing.
Doing that serves two purposes. First, it enables me to verify that (if styling) if there are seven tables at the end of the document, there are matching in-text callouts. Second, it provides an easy way for me to edit the legend or the table when I come to the callout in the text; this lets me check that the figure or table is called out in an appropriate place.
One more thing that EditTools’ Bookmarks lets me do is easily rename a bookmark to something meaningful. I select the bookmark I want to rename (#24) and click Rename (#25).
Renaming a bookmark (1)
The rename dialog opens with the default choice highlighted. In this case it is just an indicator that I have edited Table 1 (#26).

Renaming a bookmark (2)
But I could rename it to indicate something else, for example (#27):

Renaming a bookmark (3)
Note that I was also able to insert a symbol (arrow) so that I could force the bookmark to appear at the top of the list (#28).

Renaming a bookmark (4)
Again, because the Bookmark dialog can be made to remain open, this note to myself is always visible and I can get to the correct location quickly.
And with references…
The Bookmarks also help me manage references. Most of the references I work with are in numbered lists at chapter end — and there are often a lot of them (usually somewhere between 300 and 750). Invariably, the authors list a reference more than once in the reference list. I discover it after I have edited the references (which I do before I edit the main text) and run the Duplicate References macro (coming with EditTools version 8, scheduled for release in the next few weeks).
What I do is insert bookmarks similar to those shown here (#29):

Bookmarks for duplicate references
The bookmarks not only tell which are duplicate pairs (e.g., reference 12 is a duplicate of 122), but it provides an easy way to renumber and locate them. In addition, I can mark a reference for special reference in case it is likely to be referred to in the main text multiple times but not necessarily marked with a reference callout (see “CDC vaccination schedule” bookmark at #29).
Bookmarking’s future…
If you looked carefully at EditTools’ Bookmarks interface, you probably noticed some new features that we haven’t discussed in this essay. If you didn’t notice them, here is a hint (#30, #31, and #32):

A sneak peek
These new features, which are in the soon-to-be-released version 8, are the ability to create custom bookmarks (#30) that can be used repeatedly at the click of a button (#31) and auto bookmarks for the Duplicate References macro (#32). A discussion of them is for another time.
In conclusion…
Bookmarks can be very helpful and very powerful editing tools if you can get around Microsoft’s built-in limitations. They are also tools that can help increase your productivity and efficiency, and thus make your business more profitable. There may be other ways around Word’s Bookmark limitations, but the best tool I know is (of course!) my EditTools’ Bookmarks macro.
As an editor I want to be able to focus on the author’s words, not on mechanical things. I have always believed that the difference between the average and the great editor is the amount of time that can be devoted to dealing with the author’s words as opposed to those mechanical tasks we need to do
As mechanical-task demands have increased over the years, the gap between so-so editing and great editing has gotten wider. It is the making use of tools like EditTools to narrow that gap that has allowed great editing to continue to exist. Expanding the use and capabilities of bookmarks is just one tool in narrowing the gap.
Richard Adin, An American Editor
(P.S. I will announce here and at AAE on LinkedIn when EditTools 8 is released. As it has been for previous releases, upgrading from an earlier version of EditTools will be free to registered owners.)


You must be logged in to post a comment.