An American Editor

February 19, 2018

Romanized Arabic in English Texts — Part 4: Omitting, Capitalizing, and Alphabetizing the Definite Article

AElfwine Mischler

As an editor and indexer in Cairo, I often work on materials containing Arabic terms and names. The Arabic definite article, usually romanized as al-, although such a small word — only two letters, alif lam — often presents problems for writers and editors of English texts.

In Part 3, I talked about:

  • assimilating with the following letter
  • merging the article
  • elliding the vowel

In this part, I talk about more difficulties with the definite article:

  • dropping the article in names
  • capitalizing
  • alphabetizing

Dropping the Article in Names

Most newspapers and trade books drop the article from surnames when the surname alone is used on subsequent mention of a person. For example, Bashar al-Assad on first mention, and Assad on subsequent mention. If this is the style of the publisher for whom you are writing or editing, be consistent, but note that in scholarly works, styles often call for the article to not be dropped. In those instances, Bashar al-Assad is al-Assad on subsequent mention.

My Egyptian colleagues have often complained to me about styles that drop the definite article from names. They feel that the article is an integral part of their names. One colleague said that her family name El-Naggar was a Muslim family name and that Naggar was a Christian family name. Dropping the article was changing her identity. Some contemporary people spell their family name as one word without the hyphen (sometimes with camel capping, as Nobel Prize–winner Mohamed ElBaradei spells his surname) and thus ensure that the article is not dropped.

Capitalizing

My Egyptian colleagues also were adamant that the definite article in their names be capitalized, even when it was hyphenated to the main part of their name. However, most styles of romanization do not capitalize al- at the beginning of a name unless it comes at the beginning of a sentence or bibliography entry. Some styles capitalize al- only at the beginning of a sentence and not elsewhere.

When the definite article comes at the beginning of a book or journal title, styles vary. Some publishers lowercase the article in all cases, even when it comes at the beginning of a citation. Others capitalize the article if it is the first word in a title, but not elsewhere in the title.

For that matter, capitalization of other words in titles also varies among publishers. Some capitalize only the first word and proper nouns within the title, but not adjectives derived from proper nouns. The Chicago Manual of Style, 17th ed., for example, uses sentence style: “Capitalize only the first word and any proper nouns. This practice applies to titles of works as well as to names of journals and organizations” (Sec. 11.80). The International Journal of Middle East Studies (IJMES) says to follow English capitalization rules, which I would interpret to include capitalization of adjectives derived from proper nouns.

Once again, my advice to authors and copyeditors is to know what the publisher wants, be meticulous in creating your style sheet, and keep a sharp eye out for inconsistencies.

Alphabetizing

Arabic names beginning with the definite article are conventionally alphabetized by ignoring the definite article. Thus, for example, al-Nahhas is alphabetized under N. How the article is handled in alphabetical lists again varies from one publisher to another. Some will keep the article in its place but ignore it (a style often preferred by indexers), while others will detach it and add it at the end preceded by a comma: Nahhas, Mustafa al-. Indexes containing Arabic names should carry a note to that effect at the beginning to direct readers, especially in trade books. The convention is well known in scholarly circles, but a note is still useful for nonspecialist readers who might search the index.

Perhaps I have a streak of rebelliousness in me, or I am just influenced by my Egyptian colleagues who consider the article in their surnames to be integral to their identities. As more Arabs write their surnames as one unhyphenated unit, will the convention of ignoring the article in alphabetizing change? When I index a book with modern Arabic names, I itch to alphabetize all the names beginning with an article — whether it is attached or not — under A or E, depending on how the person spells his or her name. Otherwise, how will index users know (or remember if they have already read the book) that So-and-so spells his name as one word but What’s-her-name does not? Although it resulted in a long list of names under A in the index, I was quite pleased when the editor of The Oxford Handbook of Arab Novelistic Traditions requested that I not discount the article in names. However, book titles beginning with Al- had the article moved to the end of the entry.

One final note. The word for “clan,” Āl, is often written without the macron in trade books and newspapers, and might be confused for the definite article and wrongly attached to the following word with a hyphen. It appears in the name of the ruling family of Qatar, Āl Thānī, and also in the name of one sura of the Qur’an, Āl ʿImrān. If you should come upon such a name, it should be alphabetized under Al.*

*Heather Hedden, “Arabic Names,” in Indexing Names, ed. Noeline Bridge (Medford, NJ: Information Today, 2012).

Ælfwine Mischler (www.MischlerEditorial.com) is an American copyeditor and indexer in Cairo, Egypt, who has been the head copyeditor at a large Islamic website and a senior editor for an EFL textbook publisher. She often edits and indexes books on Islamic studies, Middle East studies, and Egyptology.

February 7, 2018

Lyonizing Word: Helping Authors Write

Jack Lyon

In my previous post, Lyonizing Word: Workflow for Writing, I suggested some tools that would help authors write without the problems that are almost inevitable when working in Microsoft Word. These include inconsistent and meaningless formatting, document corruption, fouled-up footnotes, incorrect AutoCorrect “corrections,” and so on. Unfortunately, most authors already use Word and aren’t likely to change. How can we, as editors, help them create Word documents that are well-structured and clean, thus reducing our own workload?

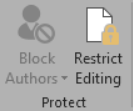
Word itself includes a feature that helps make this possible, although I doubt that many editors or authors are even aware of it: Restrict Editing. You’ll find this feature on Word’s Ribbon interface under the Review tab.

What does it do? It prevents authors from using arbitrary, meaningless formatting, applying various fonts in various sizes higgledy-piggledy all over the place as authors are wont to do. The only formatting they can do is with styles — and then only with the styles that you allow. You will like this. And your designer will like this. And your typesetter will like this.

At first, your authors will not like this. But once they understand how it works, they should find great relief in not having to design as well as write. All they have to do — all they can do — is apply a heading style to headings, a block quotation style to block quotations, and so on. They can get on with actually writing, rather than worrying about whether this heading should be bold and that one italic, whether poetry should use Garamond or Palatino. As technical writer Brendan Rowland notes in comment 153 on the blog Charlie’s Diary, “When you’ve worked with locked/protected docs in Word, you’ll never want to work any other way. Life becomes so much easier. No more user-created spaghetti formatting — this becomes a distant memory.”

Restricting Editing

Here’s how to set up a document that restricts editing in Microsoft Word:

  1. In Word, create a new document.
  2. Click the Review tab.
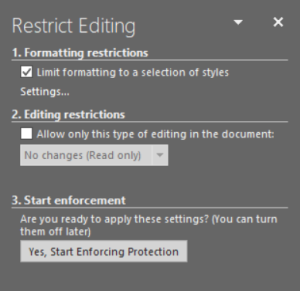
  3. Click the Restrict Editing icon (far right).
  4. Put a check in the box labeled “Limit formatting to a selection of styles.”
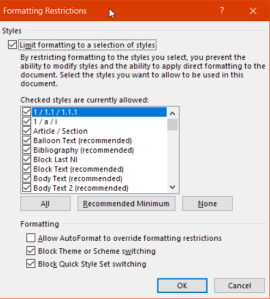
  5. Just below that, click Settings.
  6. Put a check in the new box labeled “Limit formatting to a selection of styles.”
  7. Put a check in the box next to each style that you want your authors to be able to use. For recommendations on what those styles might be, see my article “But What Styles?
  8. Under the Formatting heading, make sure the first box is unchecked and the last two are.
  9. Click the OK button.
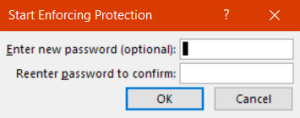
  10. Now, in the task pane on the right, click the button labeled “Yes, Start Enforcing Protection.”
  11. To enforce protection, enter a password, confirm it, and click OK. The password doesn’t need to be long and complex; it just needs to be something your authors won’t guess and that you will remember. In fact, something as simple as your initials will do. After you’ve entered a password, your authors can’t turn off protection, so it really is protection.
  12. Save the document.
  13. Give the document to your authors, instructing them to write their masterpieces in that document and no other.

Creating Character Styles

There is a problem with this system, however, and it’s a serious one. When you restrict formatting to a selection of styles, Word no longer allows you to use directly applied formatting like italic and bold — styles only, so no CTRL + I for you! The only way around this is to use character styles (not paragraph styles) that are set to use italic, bold, or whatever you need. And here, in my opinion, is what you need:

• Italic.

• Superscript.

• Subscript.

• Strikethrough.

What, no bold? Not unless you’re working with an author whose field requires bold — some branches of math or medicine, perhaps. But for most authors, access to bold means they’ll try to use it to format headings when they should be using a heading style, such as Heading 2 or Heading 3.

What, no underline? Again, not unless you’re working with an author whose field requires it. Otherwise, some authors will use underlining when they should be using italic — a holdover from the days of the typewriter.

Now you need to add the character styles to your document. Here’s how:

  1. For the time being, stop enforcing protection on the document. Otherwise, you won’t be able to create a new style. You remember your password, right?
  2. Click the little arrow at the bottom right of Home > Styles to open the Styles task pane on the right.
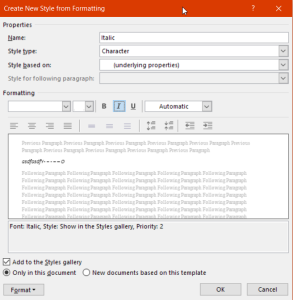
  3. At the bottom of the task pane, click the little New Style icon on the bottom left.
  4. Give your style a name, such as Italic.
  5. In the box labeled “Style type,” click the dropdown arrow and select Character. This is key to making this work.
  6. Under Formatting, click the Italic button.
  7. Click the OK button.
  8. Repeat the process for any other character styles your authors will need.
  9. Again enforce protection for the document.

A side benefit to using character styles is that they can be imported into InDesign, where they can be set to use whatever formatting is needed — something that isn’t possible with directly applied formatting like italic or bold.

Creating Keyboard Shortcuts

So now the character styles are available, but only from the Styles task pane. Not very convenient; your authors are going to want their CTRL + I back. Here’s how to provide it:

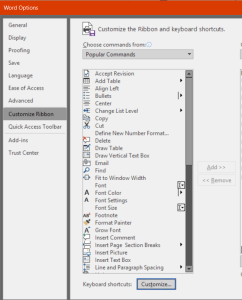
  1. Under the File tab, click Options > Customize Ribbon.
  2. Click the button labeled “Keyboard shortcuts: Customize” on the bottom left.
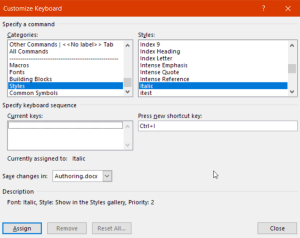
  3. In the Categories box on the left, scroll to the bottom and select Styles.
  4. In the Styles box on the right, select the style you created earlier (such as Italic).
  5. Put your cursor in the box labeled “Press new shortcut key” and, well, press a new shortcut key. Let’s use CTRL + I for our italic character style.
  6. Click the dropdown arrow in the box labeled “Save changes in:” and select your document. Now your keyboard shortcut will be saved in the document rather than in your Normal template. Don’t skip this step!
  7. Click the Assign button on the lower left.
  8. Click the Close button on the lower right.
  9. Click the OK button.
  10. Save your document.
  11. Give the document to your authors.

Now when your authors select some text and press CTRL + I, the Italic character style will be applied, so they can work without using the mouse to select the Italic style in the Styles task pane. Easy, intuitive, perfect. Rinse and repeat, with the appropriate keyboard shortcuts, for your other character styles.

At this point, you may be wondering why I didn’t just create this document for you. Stay tuned; next time I will, with a few little extras to make your life easier. But if you ever need to do all of this yourself, now you know how.

Jack Lyon (editor@editorium.com) owns and operates the Editorium, which provides macros and information to help editors and publishers do mundane tasks quickly and efficiently. He is the author of Microsoft Word for Publishing Professionals, Wildcard Cookbook for Microsoft Word, and of Macro Cookbook for Microsoft Word. Both books will help you learn more about macros and how to use them.

November 12, 2014

Lyonizing Word: Formatting with Macros

Formatting with Macros

by Jack Lyon

Most users of Microsoft Word format text by selecting a paragraph and then applying a font. More advanced users apply a style. Here’s why:

  1. Styles are easier to use than direct formatting. Once you have the style set up (with, say, 12-point Arial bold, condensed by 1 point, left justified, with 24 points of leading above and 12 points of leading below), you can apply that style with a single click. But if you apply the same formatting without using a style, you’ll have to make a dozen clicks for each heading. If your document has 50 headings, that’s hundreds of clicks—versus 50 clicks if you use a style.
  2. If you need to change the formatting of, say, level-2 headings, you can simply modify the style rather than tediously selecting each heading and applying a different font. Modify the style, and the formatting of all those headings is automatically changed.

But there is a way to handle formatting that is even more powerful—by using macros.

Suppose that you’ve dutifully applied styles to the various parts of a document, but then your client asks you to change the font—everywhere in the document—from Times New Roman to Adobe Garamond. (No, you should not just select the whole document and apply Adobe Garamond. Why? Because that simply “paints over” the real formatting that is still there in the styles, and it will almost certainly lead to inconsistent formatting somewhere down the line.) You could manually modify each style, but if there are dozens of styles in use, there is a better way. That way is a macro, like this one:

Sub SetFontInAllStyles()
Dim aStyle As Style
For Each aStyle In ActiveDocument.Style
aStyle.Font.Name = “Adobe Garamond”
Next
End Sub

Well, that was easy. Let’s look at each line of the macro (excluding the first and last lines, which simply define the beginning and end of the macro).

Dim aStyle As Style

This line defines (dimensions) a variable, aStyle (which name I just made up), as a style. At one point as the macro runs, aStyle might represent the style Heading 1. At another point it might represent Heading 3. But it will always represent a style.

For Each aStyle In ActiveDocument.Styles

Here’s where things start to get interesting. That line tells the macro to cycle through each style (represented by aStyle) in all of the styles in the active document (the document in which your cursor is currently sitting).

aStyle.Font.Name = “Adobe Garamond”

And that line tells Word to set the font for the style currently being represented by aStyle to be Adobe Garamond.

Next

The “Next” line tells Word to go to the next style in the document.

When you run the macro, it will cycle through each style in the document (For Each…) and set Adobe Garamond as the font used in that style.

But what if you want to change the font only in heading styles (Heading 1, Heading 2, and so on)? Try this:

Dim aStyle As Style
For Each aStyle In ActiveDocument.Styles
If InStr(aStyle.NameLocal, “Heading”) Then aStyle.Font.Name = “Adobe Garamond”
Next
End Sub

Here’s the line of interest:

If InStr(aStyle.NameLocal, “Heading”) Then aStyle.Font.Name = “Adobe Garamond”

That line uses a macro command we haven’t seen before, InStr, which checks for specific text in a larger string of text. In this case, it checks to see if the text “Heading” appears in the name of the style (for example, “Heading 4”). If it does, then the macro sets the font for the Heading style as Adobe Garamond.

Armed with that little beauty, you can pull off all kinds of formatting marvels. Here are just a few of the options available:

If InStr(aStyle.NameLocal, “Heading”) Then aStyle.Font.Bold = True

If InStr(aStyle.NameLocal, “Heading”) Then aStyle.ParagraphFormat.Alignment = wdAlignParagraphCenter

If InStr(aStyle.NameLocal, “Heading”) Then aStyle.NoSpaceBetweenParagraphsOfSameStyle = True

You can even specify the exact name of the style (rather than using InStr):

If aStyle.NameLocal = “Normal” Then aStyle.ParagraphFormat.Alignment = wdAlignParagraphJustify

If aStyle.NameLocal = “Heading 3” Then aStyle.Font.Italic = True

All of Word’s formatting options are at your disposal.

So yes, if you’re formatting a Word document, you should always use styles. But if you need to modify styles en masse, now you know how.

Jack Lyon (editor@editorium.com) owns and operates the Editorium, which provides macros and information to help editors and publishers do mundane tasks quickly and efficiently. He is the author of Microsoft Word for Publishing Professionals and of Macro Cookbook for Microsoft Word. Both books will help you learn more about macros and how to use them.

________

How to Add Macro to Word & to the QAT

Here’s how to put this macro (or any other) into Microsoft Word so it will be available when you need it:

  1. Copy the text of the macro, starting with the first “Sub” and ending with the last “Sub.”
  2. Click the “View” tab on Microsoft Word’s ribbon.
  3. Click the “Macros” button.
  4. Type a name for the macro in the “Macro name” box — probably the name used after the first “Sub.” For this macro, that’s “______________.”
  5. Click the “Create” button.
  6. Delete the “Sub [macro name]” and “End Sub” lines that Word created in the macro window. The macro window should now be completely empty (unless you already have other macros in there).
  7. Paste the macro text at the current insertion point.
  8. Click “File,” then “Close and Return to Microsoft Word.”

To actually use the macro:

  1. Place your cursor ___________________.
  2. Click the “View” tab on Microsoft Word’s ribbon.
  3. Click the “Macros” button.
  4. Click the name of your macro to select it.
  5. Click the “Run” button. (If you wanted to delete the macro, you could press the “Delete” button instead.)

Here’s how to put the macro on Word’s QAT (Quick Access Toolbar):

  1. Locate the QAT (it’s probably on the top left of your screen either above or below Word’s Ribbon interface).
  2. Right-click the QAT.
  3. Click “Customize Quick Access Toolbar.”
  4. Under “Choose commands from:” click the dropdown list and select “Macros.”
  5. Find and select your macro in the list on the left.
  6. Click the “Add” button to add it to the QAT.
  7. Click the “OK” button to finish.

Create a free website or blog at WordPress.com.